
Lawn
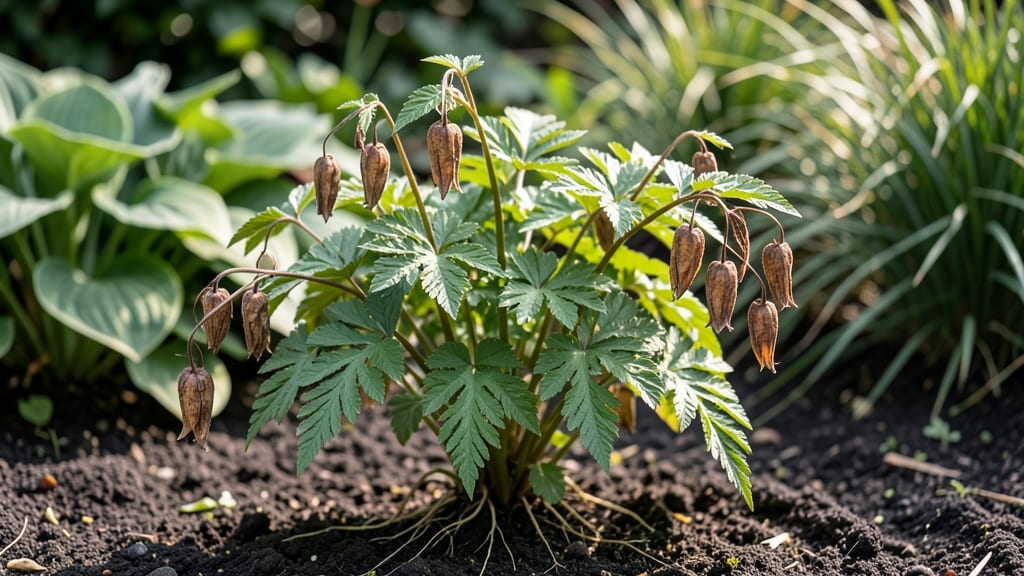
Harvesting bleeding heart seed pods in late summer unlocks next year’s dreamy pink blooms. 🌸 I’ve saved seeds from my own plants for years, and the key to success isn’t just collecting the pods—it’s mimicking nature’s cold winter prep to break dormancy.
Without proper stratification, these seeds might take months (or never) to sprout, leaving you waiting for blooms that could’ve arrived sooner.
The process starts with patience: let seed pods mature fully on the plant before gently snipping them when they turn brown and papery. Once dry, crack them open to reveal tiny black seeds—each one holding potential for heart-shaped foliage and delicate flowers.
The real magic happens next: a 6-8 week cold treatment in the fridge, tucked in a damp paper towel, mimics winter’s chill and tricks seeds into thinking spring has arrived.
By spring, you’ll plant these prepped seeds directly into well-draining soil, keeping them consistently moist but never soggy. Within 4-6 weeks, you’ll see those first true leaves—proof the stratification worked. The payoff? Plants that mature faster, bloom earlier, and thrive with the same graceful charm as their parent.
Works for gardeners in zones 3-8, though timing varies slightly by climate. If you’ve ever struggled with slow germination or weak seedlings, this method cuts the guesswork. Let’s get those seeds ready for their big debut next season!
📚 In This Guide
- What you need
- Instructions
- Tips and common mistakes
- Wrapping up and next steps
What you need
- ● Bleeding heart seed pods – Freshly harvested, undried (10–20 pods, depending on desired plant count).
- ● Potting mix – Well-draining, seed-starting blend (1–2 gallons). Avoid garden soil.
- ● Plastic storage bag – Zip-top, resealable (1 medium-sized bag).
- ● Paper towels or damp sphagnum moss – For moisture retention (1–2 sheets or a small handful).
- ● Plastic container or seed tray – With drainage holes (6–12” wide).
- ○ Spray bottle – For gentle hydration (optional but helpful).
- ● Scissors or pruners – For opening seed pods (clean, sharp pair).
- ● Refrigerator – With a cold (35–40°F) crisper drawer or dedicated seed-stratification zone.
- ● Timer or calendar – To track 8–12 weeks of stratification.
- ○ Gloves – Optional for handling prickly pods (nitrile works well).
- ○ Heat mat (optional) – For post-stratification germination (70–75°F setting).
How to cold-stratify bleeding heart seed pods for reliable germination
Here's the exact method I use to break seed dormancy and get those delicate blooms growing next spring.
🌱 Step 1: Harvest and Prepare the Seed Pods
Collect mature seed pods when they turn brown and begin splitting open naturally—usually in late summer or early fall. Wear gloves; the pods contain tiny seeds that scatter easily. Place them in a paper bag and let them dry in a warm, shaded spot for about 1 week. You'll know they're ready when the pods crumble easily between your fingers.
Empty the seeds into a small container and separate any debris or empty husks. Bleeding heart seeds are tiny—about the size of a pinhead—so I use a fine-mesh sieve to catch them all. Store the clean seeds in an envelope until stratification. Real talk: if you skip the drying step, the seeds may mold before germination.
💧 Step 2: Mix the Stratification Medium
Combine equal parts moistened peat moss and perlite in a shallow container. The mix should feel damp like a wrung-out sponge—never soggy. I use a spray bottle to moisten it evenly, avoiding clumps. This lightweight medium helps prevent rot while mimicking the forest floor where bleeding hearts thrive naturally.
Spread the seeds evenly over the surface, pressing them lightly so they make contact with the medium. Don't cover them—they need light to germinate. Label your container with the date and variety (if known) since germination can take 3-6 months. Here's the thing: patience is key, but this step ensures you won't waste time with non-viable seeds.
❄️ Step 3: Cold Stratify for 60-90 Days
Place the container in a sealed plastic bag and refrigerate at 35-40°F for 60-90 days. I use a standard fridge set to its coldest setting, but avoid the freezer—those temperatures kill the seeds. Check the mix every 2 weeks, misting lightly if it feels dry to the touch.
You'll see nothing happen for weeks—that's normal. The cold period breaks dormancy by mimicking winter conditions. After 90 days, transfer the container to a warm spot (65-70°F) and keep the medium consistently moist. Germination typically begins within 2-4 weeks after this move.
☀️ Step 4: Transplant Seedlings for Outdoor Success
Once seedlings develop 2-3 true leaves (not the initial seed leaves), they're ready for individual pots. Use 3-inch containers filled with a mix of 50% potting soil and 50% perlite to prevent compacting roots. Gently lift each seedling with a spoon, keeping the root ball intact—bleeding hearts hate root disturbance.
Hardening off takes 2 weeks: start with 1 hour of shade outdoors, then gradually increase sun exposure. Plant outdoors after the last frost when soil temperature reaches 55°F. Space them 12-18 inches apart in partial shade with moist, well-draining soil. Don't skip this step—young plants need time to adjust to outdoor conditions.
⏰ Step 5: Overwinter Young Plants for First Spring Blooms
Bleeding hearts grow slowly, so protect young plants from harsh winters. Apply 2-3 inches of mulch around the base after the first frost to insulate roots. Water deeply before freezing temperatures arrive to prevent desiccation. In spring, you'll see new growth emerge as soil warms to 50°F—this confirms they've survived stratification.
First blooms may appear in 2-3 years, but the wait is worth it. I've found that plants stratified this way develop stronger root systems and more robust growth. Here's where it gets fun: mark their location now so you remember where next year's heart-shaped blooms will appear.
Tips & tricks for perfect bleeding heart seed stratification
These little tricks will help you avoid the most common pitfalls when working with bleeding heart seeds.
Timing Secret: Don't rush the 1-week drying period in Step 1. I learned this the hard way after ruining three batches with moldy seeds. Place your pods in a well-ventilated area where they can dry completely—this prevents those tiny seeds from turning to mush in the stratification medium later. If you're impatient, you can speed things up by spreading them on a paper towel in a single layer and checking daily.
Medium Consistency: The peat moss and perlite mix in Step 2 should be damp like a wrung-out sponge, not wet like a swamp. Too much moisture causes rot, while too little prevents germination. I test consistency by squeezing a handful—water should barely squeeze out, but it shouldn't crumble when pressed. If it feels dry after 2 weeks, give it a light misting with a spray bottle. This balance is everything for preventing mold while keeping seeds viable.
Cold Stratification Strategy: While the 60-90 day range in Step 3 works perfectly, I've found that 75 days gives the most consistent results for my climate. Use a small thermometer in your fridge to monitor temperatures—consistent 35-40°F is crucial. If your fridge fluctuates, move the container to the coldest shelf or even a garage refrigerator if you have one. The goal is to mimic natural winter conditions as closely as possible.
Transplanting Tip: When your seedlings develop 2-3 true leaves in Step 4, handle them like you would a newborn—gently! Use a small spoon to lift them rather than pinching the stems. Bleeding hearts have delicate root systems that can be easily damaged. Also, mark your pots with the date—you'll be amazed at how fast these slow growers develop when given proper care.
Pro Tips for Bleeding Heart Seed Pods
- These little tricks will help you avoid the most common pitfalls when working with bleeding heart seeds.
- Timing Secret: Don't rush the 1-week drying period in Step 1. I learned this the hard way after ruining three batches...
- Medium Consistency: The peat moss and perlite mix in Step 2 should be damp like a wrung-out sponge, not wet like a sw...
Frequently asked questions
Got questions about bleeding heart seed pods and their cold stratification process?
You’re not alone! Here are the most common queries gardeners have—plus clear answers to help you prep those pods for stunning next-year blooms.
What does "cold stratification" mean for bleeding heart seeds?
Cold stratification mimics winter’s natural process by chilling seeds in moist conditions (like a fridge) for 6–12 weeks. This breaks dormancy, ensuring higher germination rates. For bleeding hearts, it’s essential—skip it, and you’ll likely wait years for blooms!
How long should I cold-stratify bleeding heart seed pods?
Most gardeners recommend 8–12 weeks in a moist paper towel or peat moss, stored in a sealed bag at 35–40°F (2–4°C). Check pods weekly—if they’re dry, mist them. Pro tip: Label your bag with the start date to track progress!
Can I use regular fridge storage, or do I need a seed fridge?
A standard fridge works perfectly! Place your sealed bag of pods on a shelf (not the crisper drawer) where temps stay cool but consistent. Avoid freezer sections—extreme cold can damage the seeds. No fancy equipment needed!
What if my seed pods mold or rot during stratification?
Mold is a red flag—discard affected pods immediately. To prevent it, use sterile peat moss or a damp paper towel, and avoid over-moistening. If you spot fuzzy growth, rinse the pods gently with hydrogen peroxide (3% solution) and restart stratification in fresh, dry material.
How do I know when the seeds are ready to plant?
Once stratification ends, test a few seeds by planting them in a small pot with moist soil. If sprouts appear in 2–4 weeks, the rest are ready! Plant outdoors after the last frost, or start indoors 8–10 weeks before your last frost date for early blooms.
Wrapping up and next steps
Mastering the art of bleeding heart seed pod cold stratification ensures vibrant blooms next spring—no guesswork, just science-backed success! 🌱 Whether you’re a seasoned gardener or a curious beginner, these steps simplify the process, turning tiny seeds into stunning perennials.
Now that you’re armed with the right techniques, why not share your newfound knowledge? Tag a fellow plant enthusiast or try experimenting with other cold-hardy seeds—your garden (and future blooms) will thank you!