
Lawn
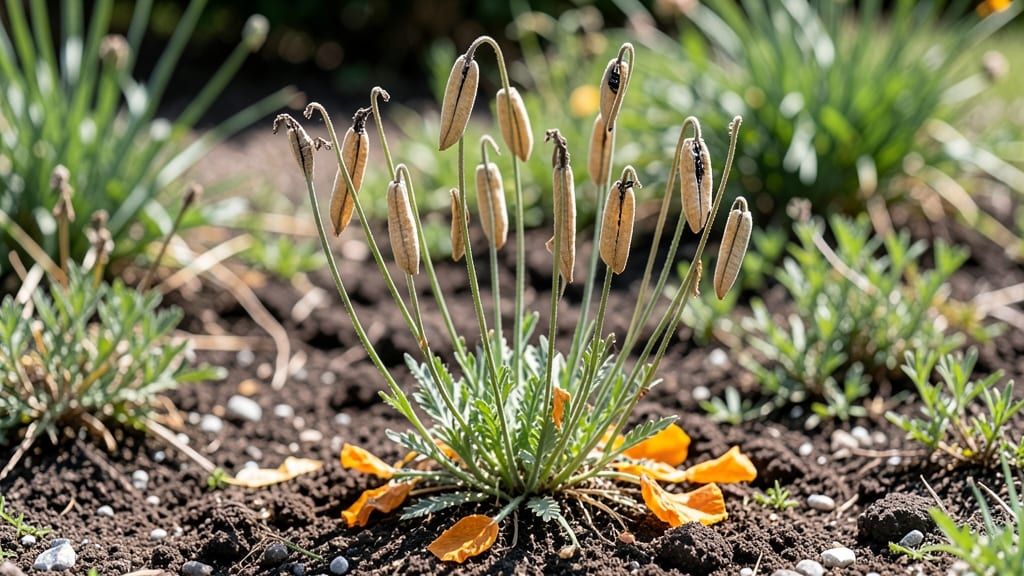
Twisting California poppy seed pods off the plant can leave you with empty husks and broken stems. ✨ The right harvesting technique ensures you collect viable seeds while keeping plants healthy for next year’s blooms—no more wasted effort or damaged foliage.
Timing matters most: harvest pods when they turn brown and papery, usually 4-6 weeks after flowering. Use clean pruners or your fingers to gently twist pods free, avoiding the delicate stems.
Spread them on a mesh screen in a dry, shaded spot for 1-2 weeks to fully dry before storage.
Store seeds in a paper envelope (not plastic) in a cool, dark place—they’ll stay viable for 2-3 years. No scarification or stratification needed; these seeds germinate easily when sown in well-draining soil after the last frost. Watch your garden explode with bright orange blooms next spring.
For large patches, skip the screen and dry pods in a brown paper bag—it traps moisture while allowing airflow. If pods resist opening, freeze them for 24 hours to mimic winter’s natural cracking process. Now you’re ready for a foolproof poppy harvest every season.
📚 In This Guide
- What you need
- Instructions
- Tips and common mistakes
- Wrapping up and next steps
What you need
- ● California poppy plants – Mature, healthy plants with fully developed seed pods (typically late summer to early fall).
- ● Pruning shears or sharp scissors – For cleanly cutting stems without damaging pods.
- ● Paper bags or breathable mesh bags – 2-3 large bags (12x15 inches) to collect pods and allow airflow.
- ● Newspaper or cardboard – A large sheet to lay pods out for drying.
- ● Rubbing alcohol (70% isopropyl) and cotton swabs – For sterilizing tools and preventing mold.
- ● Pencil or marker – To label bags with harvest dates.
- ○ Drying rack or screen – Optional but helpful for elevated airflow.
- ● Glove – Protects hands from prickly stems.
- ● Fine-mesh sieve – For separating seeds from chaff later.
- ● Desiccant packets – To absorb excess moisture during drying.
- ● Camera or notebook – To document plant varieties or harvest progress.
- ● Seed storage containers – Airtight jars or envelopes for long-term seed preservation.
Step-by-Step guide to harvesting California poppy seed pods
Here's how to collect viable seeds without damaging delicate pods—my foolproof method.
🌿 Step 1: Identify Mature Seed Pods
California poppy seed pods are ready when they turn from green to tan or light brown and begin splitting open along their seams. Wait until at least 50% of the pod's surface shows this color change—harvesting too early means immature seeds that won't germinate. I always check pods in the morning when they're dry; dew can make them appear prematurely mature.
Gently squeeze a pod between your fingers—if it feels papery and hollow with a slight give, it's ready. If it's still firm or green, wait 3-5 more days. Overripe pods will split open completely and release seeds naturally, so don't delay if you see them drying on the plant.
✂️ Step 2: Harvest Without Twisting or Breaking
California poppy stems are brittle, so I use clean, sharp pruning shears to cut 1-2 inches below the pod. Never twist or pull—the stems snap easily, and you'll lose the entire pod. Hold the stem firmly with one hand while cutting with the other to prevent any sudden movements.
Place harvested pods in a paper bag (not plastic) immediately. The breathable material prevents moisture buildup that could encourage mold. Label each bag with the harvest date—seeds stored longer than 6 months lose viability faster. I also note the location if growing multiple varieties, since California poppies can cross-pollinate.
🪴 Step 3: Dry and Process Seed Pods
Spread the pods in a single layer on a clean, dry towel in a well-ventilated area away from direct sun. I place mine on a mesh screen over a tray to allow airflow underneath. Turn pods every 24 hours to ensure even drying—this prevents moisture pockets that cause rot. Complete drying takes 7-10 days depending on humidity levels.
Once fully dry, pods will be lightweight and crisp. Gently rub two pods together in your hands—the seeds will separate naturally. For stubborn pods, place them in a paper bag and shake vigorously for 30 seconds, then sift through a fine mesh strainer to collect seeds. Discard any remaining pod fragments, which won't contain viable seeds.
⏰ Step 4: Store Seeds for Next Season
Transfer collected seeds into a small envelope or airtight container with a desiccant packet to absorb moisture. I label each with the variety name and harvest year—California poppy seeds remain viable for 2-3 years when stored properly in a cool, dark place (like a refrigerator). Never store seeds in the freezer; the temperature fluctuations damage their hardiness.
Before planting next spring, conduct a simple viability test: place 10 seeds between damp paper towels in a sealed bag. Keep them in a warm spot (70-75°F) for 7-10 days. If 50% or more sprout, your seeds are ready for sowing. If germination is poor, try storing them for another year—they often improve with age.
💡 Step 5: Prevent Common Harvesting Mistakes
I've learned the hard way that overhandling pods crushes seeds inside. Always work on a clean surface—dirt or debris can contaminate your collection. If pods feel sticky or moldy, discard them immediately; contaminated seeds won't germinate. For large harvests, wear gloves to avoid skin oils transferring to the seeds.
Don't skip the drying step—moisture is the #1 enemy of seed storage. Even slightly damp seeds develop mold within days. If you're short on time, spread pods in a single layer under a fan on low setting to speed up drying while maintaining airflow. Just avoid direct heat sources like radiators, which can scorch the pods and kill seeds.
Tips & tricks for perfect California poppy seed harvesting
These pro-level insights will help you avoid the most common pitfalls while maximizing seed viability.
Timing is Everything: The 7-10 day drying period in Step 3 is non-negotiable for seed viability. I've found that placing pods on a mesh screen with a small fan on low setting can reduce drying time to 5-7 days in dry climates—just monitor daily for moisture. The key is maintaining airflow without creating drafts that could scatter seeds prematurely. For humid areas, extend drying to 10-12 days to prevent any moisture retention.
Harvesting Technique: When using pruning shears in Step 2, I recommend cutting at a slight angle rather than straight across. This creates a larger surface area where the pod can heal if accidentally knocked, reducing seed loss. Also, harvest pods in the early morning when stems are most hydrated—this makes them slightly more pliable and less likely to snap unexpectedly. The 1-2 inch cut below the pod is perfect because it leaves enough stem to handle without risking the pod itself.
Viability Test Insight: The 70-75°F germination test in Step 4 works best if you place the damp paper towels in a sealed plastic bag with a tiny hole for airflow. I've noticed that adding a drop of hydrogen peroxide (3%) to the water can prevent fungal growth during the test, especially with older seeds. This simple modification gives you more accurate results about true viability rather than just moisture-induced sprouting.
Storage Wisdom: While the instructions mention 2-3 years of viability, I've successfully stored California poppy seeds for up to 5 years in a vacuum-sealed container with desiccant packets. The key is maintaining consistent low humidity—any fluctuation above 40% relative humidity significantly reduces longevity. I store mine in the crisper drawer of my refrigerator where temperature remains stable at 38-40°F and humidity is naturally low.
Pro Tips for California Poppy Seed Pods
- These pro-level insights will help you avoid the most common pitfalls while maximizing seed viability.
- Timing is Everything: The 7-10 day drying period in Step 3 is non-negotiable for seed viability.
- Harvesting Technique: When using pruning shears in Step 2, I recommend cutting at a slight angle rather than straight across.
Frequently asked questions
Got questions about harvesting California poppy seed pods?
You’re not alone! Here are some common concerns—and clear answers—to help you master the process for next year’s vibrant blooms.
When is the best time to harvest California poppy seed pods?
Harvest pods when they’re dry and papery but before they split open—usually late summer to early fall (August–October in most regions). Wait until the pods turn a pale brown and feel crispy to the touch. Overripe pods release seeds prematurely, reducing viability.
Why won’t my seed pods open, even when twisted?
California poppy pods are notorious for resisting! If twisting doesn’t work, try these fixes:
- Dry them further: Place pods in a paper bag for 1–2 weeks to dry completely.
- Freeze them: Pop pods into a sealed bag and freeze overnight—thawing makes them easier to crack.
- Use pliers: Gently pry open stubborn pods (wear gloves to avoid prickly residue!).
Can I collect seeds from pods that have already opened?
Yes! If pods have already released seeds, scrape the remaining debris from the ground or plant debris into a bag. Sift through it to find viable seeds (they’ll look like tiny, wrinkled beads). However, freshly harvested pods yield higher-quality seeds—prioritize those!
How should I store harvested California poppy seeds for planting next year?
Store seeds in a cool, dry place (like a sealed envelope or jar) for up to 2 years. For best results:
- Label seeds with the harvest date.
- Avoid plastic bags (they trap moisture).
- Stratify seeds (optional): Mix with damp sand and refrigerate for 2 weeks to mimic winter conditions.
What if my poppies don’t produce seed pods?
No pods? Check these common issues:
- Improper pollination: Poppies are wind-pollinated—ensure plants aren’t isolated from others.
- Over-fertilizing: Too much nitrogen = lush foliage, fewer blooms. Use low-nitrogen fertilizer.
- Pests/disease: Inspect for aphids or fungal spots (remove affected plants).
Wrapping up and next steps
Harvesting California poppy seed pods with care ensures a bountiful crop of vibrant blooms next season—no twisty tangles required! 🌸 By following the right techniques, you’ll preserve seed viability and enjoy a stunning, low-maintenance lawn or garden.
Ready to dive in? Grab your tools, head outdoors, and start collecting those pods before they burst open naturally.
- Pro Tip: Mark your calendar! Harvest pods when they’re dry and brown but still intact for the best results.
- Share your twist-resistant harvest tips with fellow gardeners—every expert was once a beginner!