
Lawn
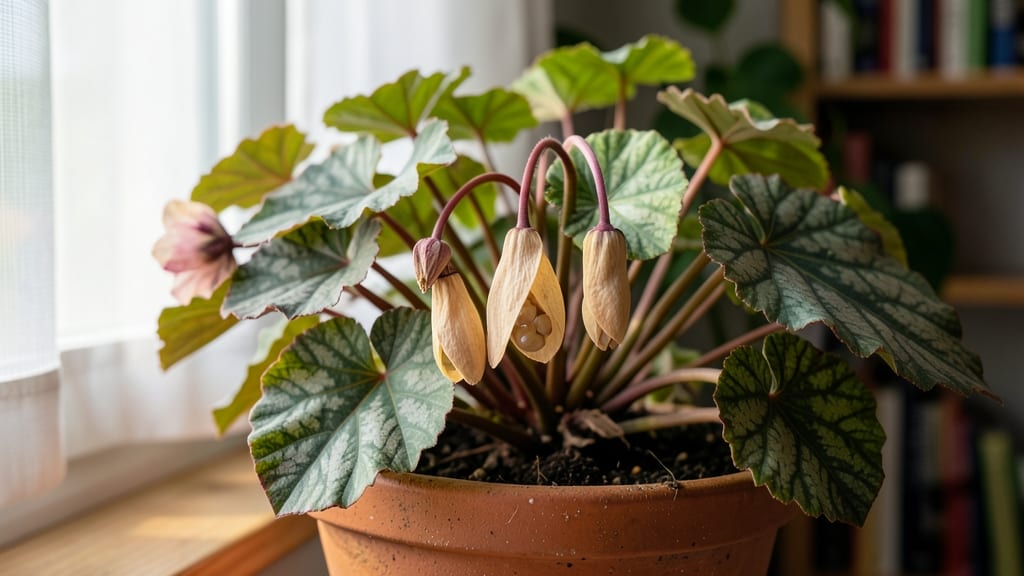
Those papery cyclamen seed pods are nature's way of saying "grow more." 🌱 I've saved seeds from my own plants for years, and the process is simpler than it looks—no fancy tools, just patience and timing.
The pods split open on their own when ripe, revealing tiny seeds ready for their next adventure in the soil.
Harvesting is the easy part: wait until the pods turn brown and start cracking open, then gently collect the seeds inside. What's tricky is knowing when they're truly ready—overripe seeds lose viability, while underripe ones won't germinate.
The key is watching for that perfect moment when the pods split naturally, usually in late summer or early fall.
Once you've got your seeds, cold stratification for 6-8 weeks mimics winter conditions and breaks dormancy. Plant them shallowly in moist potting mix, and you'll see tiny green seedlings emerge within 4-6 weeks. They grow slowly at first but develop those signature heart-shaped leaves that make cyclamen so special.
Common challenges include slow germination and leggy seedlings from insufficient light. A sunny windowsill or grow light prevents this, and a little extra patience pays off with plants that thrive for years. The best part? You're creating new cyclamen exactly like your favorites—zero waste, all reward.
📚 In This Guide
- What you need
- Instructions
- Tips and common mistakes
- Wrapping up and next steps
What you need
- ● Mature cyclamen plants: Choose healthy plants with fully developed seed pods (usually after flowering, in late summer/fall). Aim for at least 3-5 pods for a good seed yield.
- ● Pruning shears or small scissors: To carefully snip open pods (sterilize with rubbing alcohol first!).
- ● Brown paper bags or breathable mesh bags: 2-3 medium-sized bags (labeled with the plant name and date) for drying seeds. Avoid plastic—it traps moisture!
- ○ Tweezers or a fine brush: For gently removing seeds from dried pods (optional but helpful for delicate cyclamen seeds).
- ● Envelope or seed packet: 1-2 acid-free envelopes (or a small paper bag) for long-term storage.
- ● Permanent marker: To label your seeds with the variety and harvest date.
- ● Desiccant packets: Place 1-2 in your drying bags to absorb excess moisture if humidity is high.
- ● Magnifying glass: For inspecting seeds for viability (look for plump, undamaged seeds).
- ● Seed catalog or notebook: To track seed sources and germination notes.
- ● Spray bottle with water: For lightly misting pods if they’re stubbornly closed (use sparingly!).
How to harvest and save cyclamen seeds from pop-open pods
Here's how to turn those fascinating pop-open cyclamen pods into fresh plants without buying new seeds.
🌱 Step 1: Identify and Harvest Mature Seed Pods
Wait until the pods turn from green to brown and papery—this signals they're ready to open naturally. I like to harvest them on a dry, sunny morning when the air is still. Gently twist the pod from the stem, being careful not to crush it. The pods should feel light and hollow when mature.
If you miss the natural opening, you can speed things up by placing the pods in a paper bag for a day or two. The movement inside will trigger them to pop open sooner. Just don't seal the bag completely—you want airflow to prevent mold.
💧 Step 2: Extract Seeds and Clean Them Gently
Once the pod pops open, you'll find tiny, reddish-brown seeds attached to a fluffy matrix. Use a small bowl and carefully shake the seeds out onto a clean, dry surface. I like to spread them on a white paper towel—the contrast makes it easier to spot any debris or damaged seeds.
Remove any remaining fluff or plant debris by gently rolling the seeds between your fingers over the paper. Don't wash them—they're tiny and delicate. If you see any black or shriveled seeds, discard them as they won't germinate. Healthy seeds should look plump and slightly shiny.
☀️ Step 3: Prepare Seed Trays for Germination
Fill small seed trays or pots with a light, well-draining mix—I use a blend of 50% peat moss and 50% perlite for best results. Moisten the mix until it's evenly damp but not soggy. Press it down lightly so it's firm enough to hold the tiny seeds in place.
Scatter the seeds sparingly—they're small but not as dense as some other flowers. A light sprinkle is plenty. Don't cover them with soil; cyclamen seeds need light to germinate. Just press them gently into the surface so they make contact with the mix.
🌿 Step 4: Create Ideal Germination Conditions
Place the trays in a warm, bright spot—I use a seedling heat mat set to 70-75°F for consistent warmth. Cover the trays loosely with clear plastic wrap to retain humidity, but leave a small gap for airflow. Check daily for condensation—if you see water droplets, remove the wrap for a few hours to prevent mold.
Germination can take 4-8 weeks, so patience is key. Keep the mix consistently moist by misting lightly every 2-3 days. You'll know it's time when you see tiny green sprouts pushing through the surface. Once they appear, remove the plastic wrap immediately to prevent damping-off.
⏰ Step 5: Transplant and Care for Young Cyclamen
When seedlings develop their first true leaves (not the initial cotyledons), they're ready to transplant. Use small pots—2-3 inches in diameter—filled with the same light mix. Gently lift each seedling with a spoon or your fingers, being careful not to damage the delicate roots.
Place the pots in bright, indirect light—cyclamen hate harsh sun. Water from the bottom by placing the pots in a tray of water for 10-15 minutes, then let them drain completely. They're sensitive to overwatering, so always check the top inch of soil before watering again.
Tips & tricks for perfect cyclamen seed germination
These little-known tricks will help you maximize your seed-saving success with cyclamen pods.
Timing Tip: Harvest pods when they're completely brown and papery—not when they're still green or starting to turn. I've learned this the hard way: green pods won't open naturally, and you'll waste time waiting for seeds that won't develop properly. The right timing ensures you get the maximum number of viable seeds from each pod.
Seed Selection: When cleaning your seeds, focus on those that are plump and slightly shiny rather than flat or dull. I spread them on white paper towels to easily spot the good ones—the contrast makes it simple to identify healthy seeds. Discard any black or shriveled seeds immediately, as they won't germinate no matter how carefully you treat them.
Germination Environment: The 70-75°F temperature range is crucial for successful germination. If your home tends to be cooler, consider using a seedling heat mat underneath your trays. I've found that maintaining this warmth consistently makes all the difference in germination rates. Just remember to leave that small airflow gap in your plastic wrap to prevent mold from forming.
Transplanting Technique: When it's time to transplant those tiny seedlings, use a spoon or small fork to gently lift them rather than pulling by the leaves. Cyclamen roots are delicate, and you want to preserve as much of the root system as possible. I've seen seedlings completely uprooted when pulled too hard—take your time with this step for healthier plants.
Pro Tips for Cyclamen Seed Pods
- These little-known tricks will help you maximize your seed-saving success with cyclamen pods.
- Timing Tip: Harvest pods when they're completely brown and papery—not when they're still green or starting to turn. I...
- Seed Selection: When cleaning your seeds, focus on those that are plump and slightly shiny rather than flat or dull. ...
Frequently asked questions
Got questions about cyclamen seed pods?
You’re not alone—these fascinating little pods are full of surprises! Here’s what you need to know to save seeds like a pro.
When do cyclamen seed pods appear, and how long until they’re ready to open?
Cyclamen seed pods typically form 4–6 weeks after flowering, starting as small, green bulges behind the blooms. They’ll turn brown and papery when mature—usually in late summer to early fall. Once dry, they’ll pop open dramatically (like tiny firecrackers!) to release seeds. Patience is key! Harvest them before they fully burst to avoid seed loss.
How do I know if a cyclamen seed pod is ready to harvest?
Look for these signs:
- Color shift: Pods turn from green to tan or light brown.
- Texture: They feel dry and crispy (like a puffed rice cereal).
- Sound: Gently shake—if they rattle, they’re ready!
What should I do if my cyclamen seed pods won’t open on their own?
Sometimes pods get stuck in a "half-dry" state. Try these tricks:
- Bake them: Place pods in a low oven (150°F/65°C) for 10–15 minutes to speed up drying.
- Freeze them: Pop pods into the freezer for 24 hours to break down moisture.
- Hand-crack: Gently squeeze the pod over a tray—seeds will spill out.
Can I grow cyclamen from seed pods, or should I buy plants?
Cyclamen seeds are easy to grow—just scatter them on soil (no need to bury) and keep them moist but not soggy. Germination takes 4–8 weeks in warm conditions (70°F/21°C). Seed-grown cyclamen may take 2–3 years to bloom but often produce hardier, more unique varieties than store-bought plants.
What if my cyclamen seed pods don’t produce seeds?
Empty pods usually mean poor pollination. Try these fixes:
- Hand-pollinate: Use a soft brush to transfer pollen from one flower to another.
- Attract pollinators: Plant nearby bee-friendly flowers (like lavender or marigolds).
- Check health: Stressed plants (from overwatering or pests) may drop buds early.
Wrapping up and next steps
Cyclamen seed pods offer a zero-waste, magical way to save seeds while embracing nature’s pollination process. Whether you’re a gardener eager to propagate new plants or simply love sustainable practices, these delicate pods remind us how effortless—and rewarding—seed saving can be. 🌱
Ready to dive deeper? Start by observing your cyclamen plants this season, and let their seed pods inspire your next green project! Share your discoveries with fellow gardeners or explore other easy seed-saving methods—your garden (and the planet) will thank you. 🌟