
Lawn
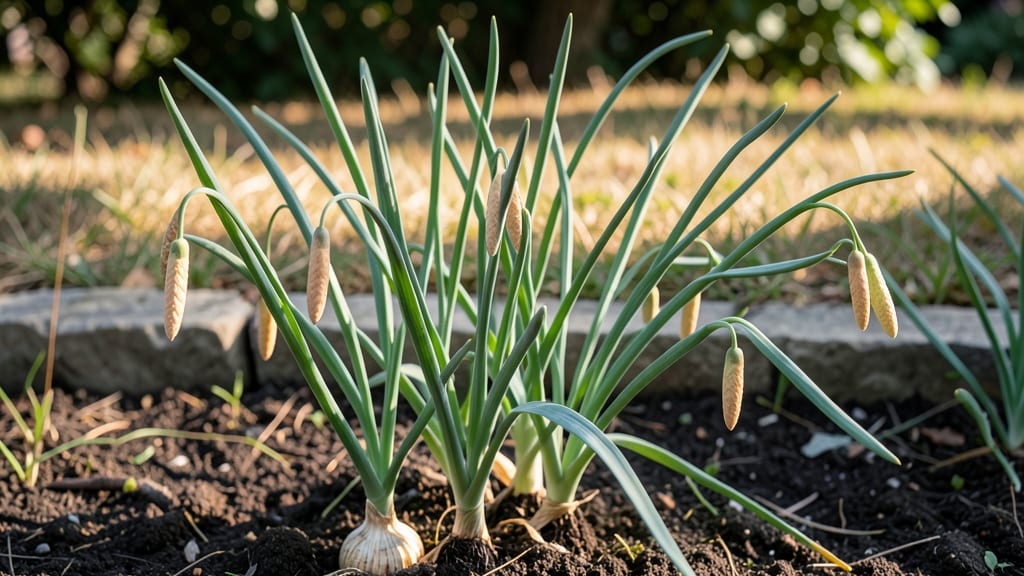
Drying green onion seed pods preserves your favorite varieties for next year’s harvest. 🌱 I’ve saved seeds from my own garden for three seasons now, and the fresh regrowth each spring makes it worth every minute of drying time.
The key is patience—letting those pods mature fully before storage ensures strong germination when you replant.
You’ll need just a few simple supplies: scissors or pruners, paper bags for drying, and a cool, dry spot to store them. Harvest the pods when they turn brown and papery, then bundle stems together in bags to dry completely—usually 2-3 weeks.
Once fully dry, crack open the pods to release seeds, which can last 3-5 years if stored properly.
Planting is straightforward: scatter seeds ¼-inch deep in well-draining soil, keep it moist, and expect sprouts in 7-14 days. Green onions thrive in full sun to partial shade and prefer loose, fertile soil.
With consistent moisture, you’ll have snippable regrowth in 3-4 weeks—faster than buying transplants, and far more satisfying.
Troubleshooting is easy once you know the signs: slow germination? Check seed freshness. Yellowing leaves? Adjust watering—too much or too little can stress them. And if pests appear, a simple spray of neem oil keeps them at bay.
The best part? You’ll never buy green onions again once you master this cycle.
📚 In This Guide
- What you need
- Instructions
- Tips and common mistakes
- Wrapping up and next steps
What you need
- ● Mature green onion plants – Choose healthy, disease-free plants with fully developed seed pods (usually late summer/early fall).
- ● Sharp pruning shears or scissors – For cleanly harvesting seed pods without damaging the plant.
- ● Paper bags or breathable mesh sacks – 2-3 per plant (to allow airflow during drying).
- ● Drying rack or clean, dry surface – A screen, wire rack, or even a cardboard box with holes works.
- ● Permanent marker or labels – To mark varieties (e.g., "scallion mix" or "organic heirloom").
- ● Air-tight storage containers – Small glass jars, resealable bags, or seed envelopes (with silica gel packets for extra moisture control).
- ● Desiccant packets – Add to storage containers to prevent mold.
- ● Food dehydrator – Speeds up drying if pods are damp (set to 95°F–115°F).
- ● Humidity monitor – Ensures drying conditions stay ideal (40–60% humidity).
- ● Seed catalog or notebook – Track varieties, harvest dates, and germination notes.
- ● Patience – Seed pods take 2–4 weeks to fully dry indoors.
- ● Sunny, dry weather – Harvest pods on a warm, cloudless day for best results.
- ● Knowledge of your climate – Some regions may need to start pods indoors if frost is early.
Step-by-Step guide to harvesting and storing green onion seed pods
Here's how I preserve green onion seed pods for reliable regrowth next season—no fancy equipment needed.
🌱 Step 1: Identify and Harvest Mature Seed Pods
Green onion seed pods form after flowering, appearing as small, round, papery husks at the plant's base. Wait until they turn light brown and feel dry to the touch—this signals full maturity. I pinch them off with my fingers (no need to cut) and place them in a paper bag to prevent moisture buildup.
Harvest on a dry morning after dew has evaporated. Wet pods won't dry properly and may develop mold. If you miss the window, pods left too long on the plant will split open, scattering seeds prematurely.
💧 Step 2: Dry the Seed Pods Thoroughly
Spread the harvested pods in a single layer on a clean, dry surface like a wire rack or baking sheet. Place them in a well-ventilated area with indirect sunlight—direct sun can overheat and crack the pods. I use a fan on low to circulate air and speed up drying.
Drying takes 7-10 days depending on humidity. You'll know they're ready when the pods feel lightweight and rattle when shaken. If any remain slightly moist, return them to the drying surface for another day or two.
☀️ Step 3: Store in Airtight Containers
Once completely dry, transfer the pods to small paper envelopes or glass jars with airtight lids. I label each with the variety name and harvest date—this helps track freshness, as seeds lose viability over time. Store in a cool, dark place like a pantry or refrigerator.
Seeds remain viable for 2-3 years when stored properly. Check periodically for signs of moisture or pests—condensation inside the container means you need to redistribute the pods to dry further.
⏰ Step 4: Test Germination Before Planting Next Year
Before sowing, test a few seeds to confirm viability. Place 5-10 pods in a damp paper towel, fold it, and store in a ziplock bag in a warm spot (70-75°F). Check daily—you should see sprouts in 7-14 days. If fewer than half sprout, store the rest for another year or harvest fresh pods.
For planting, sow seeds ¼ inch deep in well-draining soil and keep moist until germination. Thin seedlings to 2 inches apart once they reach 2 inches tall. This ensures strong, healthy regrowth for next season's harvest.
Tips & tricks for perfect green onion seed pod preservation
Preserving these delicate seed pods properly makes all the difference for next season's harvest. Here's what I've learned after years of trial and error.
Harvesting Timing: The light brown color and dry texture are your key indicators in Step 1—don't rush this! I've seen pods harvested too early develop mold during storage, while those left too long on the plant scatter seeds prematurely. A dry morning harvest prevents moisture buildup in your paper bag, which could trigger spoilage.
Drying Surface Selection: In Step 2, I recommend using a wire rack over a baking sheet because it allows air to circulate from all sides. If you only have a baking sheet, poke small holes in parchment paper to prevent moisture trapping. The single layer is critical—overcrowding creates pockets of humidity that slow drying and invite mold.
Storage Environment: For Step 3, cool and dark is non-negotiable. I've had containers stored in kitchen cabinets near the stove develop condensation from heat fluctuations. Place your containers in the back of the pantry or on a refrigerator shelf (not the door) for most stable conditions. The 2-3 year viability promise only holds if you maintain these conditions consistently.
Germination Test Precision: When testing viability in Step 4, use exactly 5-10 pods to avoid overcrowding in your damp paper towel. I've seen tests with too many pods develop mold before sprouting. The 70-75°F temperature range is crucial—any cooler and germination slows dramatically, while warmer temperatures can cause uneven sprouting or fungal growth.
Pro Tips for Green Onion Seed Pods
- Preserving these delicate seed pods properly makes all the difference for next season's harvest. Here's what I've lea...
- Harvesting Timing: The light brown color and dry texture are your key indicators in Step 1—don't rush this! I've seen...
- Drying Surface Selection: In Step 2, I recommend using a wire rack over a baking sheet because it allows air to circu...
Frequently asked questions
Got questions about saving green onion seed pods for next season?
You’re not alone! Here are the most common queries—and straightforward answers—to help you master the process like a pro.
How do I know when green onion seed pods are ready to harvest?
Harvest seed pods when they turn from green to a tan or light brown color and feel dry to the touch. They should easily pop open when gently squeezed—this means the seeds inside are mature and ready for collection. Avoid waiting too long, or the pods may burst open naturally and scatter seeds.
How long do dried green onion seed pods stay viable for storage?
Properly dried and stored seed pods can remain viable for 1–3 years, though germination rates drop after year two. Store them in a cool, dark, and dry place (like a sealed container in the fridge or a pantry) to maximize freshness. Label them with the harvest date to track viability!
Can I grow green onions from seed pods instead of buying new seeds?
The seeds inside the pods are 100% usable for planting. Simply open the dried pods, extract the small black seeds, and sow them directly into soil. They’ll grow just like store-bought seeds—though germination may take 10–14 days longer. A cost-effective and sustainable win!
Why did my green onion seed pods mold or rot during drying?
Mold or rot usually means the pods were too damp when stored. To prevent this:
- Ensure pods are fully dry (no moisture) before storing.
- Avoid humid environments—opt for a dehumidifier or silica gel packets if needed.
- Check for pest damage (like weevils) before sealing storage containers.
What’s the best way to store seed pods if I don’t have a pantry?
No pantry? No problem! Use these alternative storage hacks:
- Fridge crisper drawer: Place pods in a paper envelope or airtight container to absorb minimal moisture.
- Freezer backup: Store pods in a ziplock bag with a silica packet for up to 6 months.
- Outdoor shed: Keep pods in a sealed metal tin (if temps stay below 70°F).
Wrapping up and next steps
Growing green onions from seed pods is a rewarding way to enjoy fresh, homegrown harvests year after year! With just a few simple steps—drying, storing, and replanting—you’ll have a steady supply of flavorful green onions without breaking the bank. 🌱
Ready to take the next step? Start by harvesting your green onions today and follow the drying process. Before you know it, you’ll be savoring homegrown goodness with minimal effort. Happy gardening! 🌿✨