
Lawn
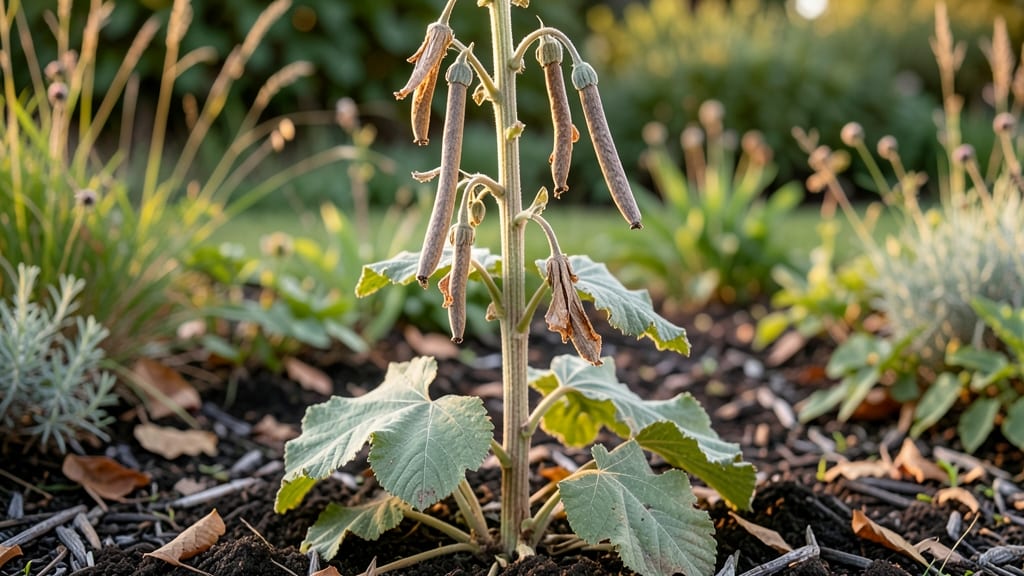
Those tall, rustling hollyhock seed pods hold the key to next year’s fragrant blooms—if you dry them right. 🌿 I’ve learned the hard way that rushing the process means shriveled seeds that won’t germinate, so timing and patience are everything when collecting these spiky treasures.
The best time to harvest is when the pods turn brown and start splitting open—usually late summer to early fall. Just snip them off the stem with clean shears, leaving a little stem attached to help with drying.
Spread them out in a dry, well-ventilated spot (like a mesh bag or paper bag) for 2-4 weeks, shaking them gently every few days to release any lingering moisture.
Once fully dry, the seeds will rattle inside like tiny maracas. Store them in a sealed envelope or jar in a cool, dark place—viable seeds stay good for 2-3 years.
When planting, scatter them on top of soil in early spring; they need light to germinate, so don’t bury them.
Pro tip: Label your seed packets with the variety name and harvest date—hollyhocks come in so many colors and heights, you’ll want to keep track! With the right drying method, you’ll have a whole new garden of towering, sweet-smelling blooms waiting for you next season.
📚 In This Guide
- What you need
- Instructions
- Tips and common mistakes
- Wrapping up and next steps
What you need
- ● Mature hollyhock seed pods: Collect pods from healthy plants after they’ve turned brown and dried naturally on the stem (usually late summer to early fall). Aim for at least 10-15 pods for a good harvest.
- ● Pruning shears or sharp scissors: Use clean, sterilized tools to snip pods from the stem without damaging them.
- ● Brown paper bags or breathable mesh bags: Choose unbleached, natural-fiber bags (1-2 per batch of pods) to allow airflow while protecting them from pests.
- ● Rubber bands or twine: Secure the top of the bags to keep pods contained.
- ● Drying location: A cool, dry, and well-ventilated spot like a garage, shed, or indoor shelf (avoid direct sunlight or humidity).
- ● Labeling tags or masking tape: Mark bags with the plant variety and drying date for easy organization.
- ● Desiccant packets (silica gel): Place 1-2 in the bag to speed up drying if your climate is humid. 🌡️
- ● Fine-mesh seed envelopes: Store dried seeds in paper envelopes for long-term preservation.
- ● Handheld fan or dehumidifier: Use near the drying area to reduce moisture in damp conditions.
- ● Notebook or app: Track drying progress, pod sources, and germination notes for future reference.
Step-by-step guide to harvesting and drying hollyhock seed pods
Here's how to save seeds from your fragrant blooms for next season's garden.
🌱 Step 1: Identify and Select Mature Seed Pods
Wait until the flower heads have fully browned and dried on the plant—this usually happens in late summer or early fall. The seed pods will feel papery and turn a deep chocolate-brown color. Gently squeeze one to test: if it crumbles easily, it's ready for harvesting. Avoid pods that still feel firm or green.
Select the healthiest pods from the strongest stems. Hollyhocks often produce pods with varying maturity, so focus on the ones that have completely dried. I like to harvest on a dry morning after the dew has evaporated—this prevents moisture from making the pods stick to my hands or tools.
✂️ Step 2: Harvest and Prepare the Pods
Use clean, sharp scissors or pruning shears to snip the seed pods from the stems. Cut about 1 inch below the pod to avoid damaging the plant. Place the pods in a single layer on a clean, dry surface like a baking sheet or newspaper. Don't stack them—they need airflow to dry properly.
Remove any remaining dried flower debris or damaged pods immediately. You'll notice some pods may have already split open, releasing seeds. These are fine to use, but save the intact pods for drying. I always label my pods with the variety name and harvest date using a soft pencil—this helps me track which types I've saved.
💧 Step 3: Dry the Seed Pods Properly
Find a warm, dry, and well-ventilated spot to dry your pods. A temperature between 65-75°F works best, with good airflow to prevent mold. I place my pods on a mesh screen or in a paper bag with holes punched in the sides—this allows air to circulate while keeping them contained.
Check the pods every few days. They're fully dry when the outer shell feels completely brittle and the seeds inside rattle when shaken. This usually takes 2-4 weeks, depending on your climate. If humidity is high, drying may take longer—consider using a small fan on low setting to improve airflow.
🪴 Step 4: Extract and Store the Seeds
Once the pods are completely dry, gently crush them between your fingers or use a small hammer to break them open. Be careful not to damage the seeds inside. I like to place the crushed pods in a clean paper bag and shake it gently to release the seeds. Remove any remaining pod fragments or debris.
Store the seeds in a cool, dry place in an airtight container like a glass jar or envelope. Label it with the variety name and harvest date. Hollyhock seeds remain viable for 2-3 years when stored properly. I keep mine in the refrigerator to extend their shelf life—this mimics natural winter conditions and helps preserve their viability.
⏰ Step 5: Prepare for Next Season's Planting
In early spring, test a few seeds by planting them in small pots filled with seed-starting mix. Keep the soil moist and place the pots in a warm, sunny spot. Hollyhock seeds usually germinate within 10-14 days if kept at 65-75°F. Once the seedlings have 2-3 sets of true leaves, they're ready to be transplanted outdoors.
If you're planting directly in the garden, sow the seeds in well-drained soil after the last frost date. Hollyhocks thrive in full sun and prefer slightly alkaline soil. Space the seeds 12-18 inches apart to allow for proper airflow and reduce the risk of fungal diseases. Watch for the first true leaves to emerge—this is your signal that germination is successful.
Tips & tricks for perfect hollyhock seed pod preservation
These little-known strategies will help you maximize seed viability and avoid common pitfalls while saving your fragrant blooms for next season.
Timing Secret: Harvesting at the right moment is everything. I've learned the hard way that pods need to be completely dry before handling—they'll crumble easily when mature, but if they're even slightly damp, they'll mold during drying. A good rule of thumb is to harvest when the pods have turned deep chocolate-brown and feel papery to the touch. If you're unsure, wait one more week rather than harvesting too early.
Drying Environment: The 65-75°F temperature range mentioned in the instructions is ideal, but airflow is just as important. I've found that placing pods on a mesh screen with a small fan circulating air on low setting cuts drying time by nearly half in humid climates. Just avoid direct airflow that could blow seeds out of partially open pods. A simple kitchen fan placed 2 feet away works perfectly for this.
Storage Wisdom: While the instructions mention 2-3 years of viability, I've extended this to 4 years by using small glass jars with silica gel packets inside. The refrigerator trick works, but I also place my jars in the freezer for 24 hours before final storage to kill any potential mold spores. Label each jar with the variety and harvest date—trust me, you'll forget which type is which after a few years!
Pro Tips for Hollyhocks Seed Pods
- These little-known strategies will help you maximize seed viability and avoid common pitfalls while saving your fragr...
- Timing Secret: Harvesting at the right moment is everything. I've learned the hard way that pods need to be completel...
- Drying Environment: The 65-75°F temperature range mentioned in the instructions is ideal, but airflow is just as impo...
Frequently asked questions
Got questions about saving those iconic hollyhock seed pods for next season? You’re not alone! Here are answers to the most common queries—so you can dry, store, and replant with confidence.
When is the best time to harvest hollyhock seed pods?
Harvest pods when they turn light brown and start splitting open—usually late summer to early fall (August–October). Wait too long, and seeds may scatter! If pods are still green, give them another 1–2 weeks. Pro tip: Check daily for optimal timing.
How long does it take to dry hollyhock seed pods?
With proper airflow, pods dry in 2–4 weeks. Hang them upside down in a well-ventilated, dry spot (like a garage or shed). Avoid direct sunlight or humidity—this prevents mold. Sign they’re ready: Seeds rattle inside when shaken.
Can I dry hollyhock seed pods indoors?
Yes! Use a paper bag with holes (for airflow) or a mesh bag near a fan or dehumidifier. Just avoid airtight containers—trapped moisture = mold. Alternative: Place pods in a single layer on a tray with silica gel for faster drying.
What if my seed pods get moldy or damp?
Toss them immediately—mold ruins seeds. To prevent this, recheck pods weekly and move them if humidity rises. For damp pods, spread them on paper towels in a dry area for 24–48 hours. Prevention tip: Harvest on sunny, dry days to start.
How do I store dried hollyhock seeds long-term?
Keep seeds in a cool, dark place (like a fridge or sealed jar) for up to 2–3 years. Label with the variety and date! For extra protection, add a silica packet to absorb moisture. Germination tip: Plant fresh seeds—viability drops after 1 year.
Wrapping up and next steps
Hollyhocks seed pods are a gardener’s secret weapon for next year’s show-stopping blooms—and with the right drying technique, you’re set for success! 🌸 Whether you’re a seasoned green thumb or just starting, preserving these pods is simple, rewarding, and ensures your garden stays fragrant and vibrant.
Now that you’re armed with the how-to, why not take the next step?
🌱 Your Next Steps:
- Label & Store: Mark your dried pods with the variety and year for easy identification.
- Experiment: Try growing from seed—it’s budget-friendly and fun!
- Share the Love: Gift a few pods to fellow gardeners or swap seeds in local groups.
Happy gardening—your future hollyhocks are counting on you! 🌿✨