
Lawn
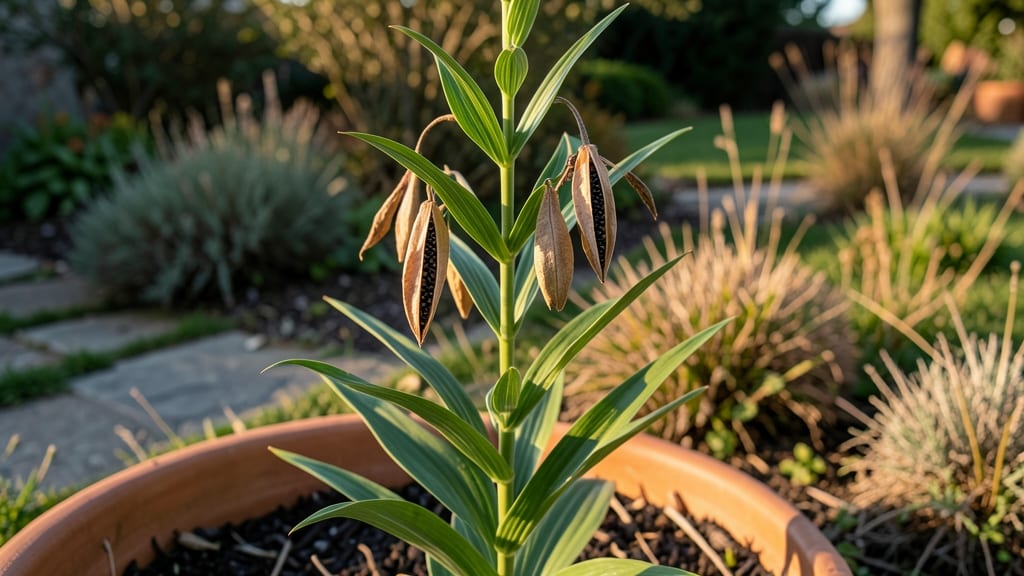
Twisting a lily seed pod to test its readiness was the game-changer I needed for reliable germination. 🌱 The moment the pod cracks open with a satisfying pop, you know the seeds inside are ready to be harvested—this simple trick saves weeks of guesswork and wasted effort.
Most gardeners overlook this step, but I’ve learned that seed viability drops fast once the pod turns brown and papery. Harvesting at the right stage means seeds that sprout within 2-4 weeks instead of months of waiting (or never). Store them in a cool, dry place until spring planting.
You’ll end up with sturdy seedlings that outpace store-bought plants, and the process is simpler than you’d think. No fancy equipment—just patience, a twist test, and a little soil magic. The payoff? A garden full of lily blooms you grew from seed.
Works for Asiatic, Oriental, and even some daylilies. Here’s how to do it right the first time—no more empty pods or disappointing germination rates.
📚 In This Guide
- What you need
- Instructions
- Tips and common mistakes
- Wrapping up and next steps
What you need
- ● Lily seed pods: 5–10 fresh, mature pods (harvested from healthy lilies after blooms fade). Pro tip: 💡 Choose plump, dry pods with intact seeds!
- ● Well-draining potting mix: 1–2 gallons (use a blend of peat moss, perlite, and compost for optimal aeration).
- ○ Small pots or seed trays: 4–6 inches deep (with drainage holes). Optional: Clear plastic domes or plastic wrap to retain humidity.
- ● Watering can or spray bottle: For gentle hydration (avoid soaking!).
- ● Grow lights or sunny windowsill: 6–8 hours of indirect light daily (south-facing windows or LED grow lights work best).
- ● Pruning shears or scissors: For harvesting pods and trimming stems.
- ○ Glove (optional): Lilies can have mild irritants—wear gloves if sensitive.
- ● Labeling tags: To track seed pod varieties (e.g., "Daylily Hybrid" or "Asiatic Lily").
- ● Patience!: Lily seeds can take 6–12 months to germinate—plan ahead for next spring’s blooms! 🌸
How to grow lilies from seed pods for future blooms
Here's the simple way to test and grow lily seeds—no fancy tools, just patience and a green thumb.
🌱 Step 1: Harvest and Test Seed Pod Viability
Wait until the seed pod turns brown and papery before harvesting—this usually happens late summer to early fall after blooms fade. Twist the pod gently to release seeds; if it resists, let it dry further on the plant. Healthy seeds feel plump and firm—discard any that look shriveled or hollow.
I like to soak seeds in lukewarm water for 24 hours before planting. This softens the outer coating and speeds up germination. Place them in a small container with just enough water to cover them, then leave them undisturbed. You'll know they're ready when tiny white roots appear—usually within 1-3 days.
💧 Step 2: Prepare Containers and Planting Medium
Use small pots (3-4 inches deep) with drainage holes—lily seeds need room to grow without crowding. Fill the bottom 1 inch with coarse perlite or sand to improve drainage, then add well-draining potting mix (never garden soil—it compacts too easily). Moisten the mix until damp but not soggy.
Make a ¼-inch deep hole with your finger and place 1-2 seeds per pot (they germinate slowly, so spacing saves heartache). Cover lightly with additional mix—don’t press down hard, or you’ll smother the seeds. Label each pot with the lily variety and planting date, because these take 6-12 months to sprout.
☀️ Step 3: Provide Consistent Moisture and Light
Keep the soil evenly moist (not wet) by watering from the bottom—place pots in a tray of ½ inch of water for 10 minutes, then drain excess. Overwatering causes rot, while dry soil halts germination. You’ll notice condensation on the pot’s sides when moisture is just right.
Place pots in bright, indirect light (like an east-facing window) to prevent leggy seedlings. Direct sun can scorch tender sprouts, but too little light delays growth. If leaves look pale or stretched, move the pot closer to the light source—you’ll see stronger, stockier stems within a week.
⏰ Step 4: Wait for Germination and Early Growth
Germination can take 6-12 months, so patience is key. Check pots weekly for tiny green shoots—they’ll appear as thin, grass-like leaves first. Once sprouts reach 2 inches tall, transplant them into 4-inch pots with fresh potting mix to give roots more space.
Here’s the thing—you’ll likely lose some seeds to slow germination or rot. But when that first true leaf unfurls (a larger, broader shape than the initial sprouts), you’ve won. Keep them in moderate light (no direct sun yet) and water when the top inch of soil feels dry.
🌿 Step 5: Overwinter and Transplant Outdoors Next Spring
Move pots to a cool, dark place (50-60°F) for winter—lilies need dormancy to mature. Check soil monthly; it should stay barely moist (never soggy). In early spring, when nighttime temps stay above 50°F, harden off seedlings by placing them outside for 1-2 hours daily, gradually increasing time over 2 weeks.
Transplant outdoors after the last frost, spacing seedlings 12-18 inches apart in well-draining soil with added compost. Mulch around the base to retain moisture and protect roots. It’ll take 3-5 years for lilies grown from seed to bloom—but the wait is worth it for those first vibrant, unique flowers in your garden.
Tips & tricks for growing lilies from seed pods
Here’s how to maximize your chances of success with these patient little gardeners.
Seed Viability Test: Before planting, float-test your seeds in a glass of water. Viable seeds sink to the bottom within 15 minutes—discard any that float. This quick check saves you from planting duds. I’ve found this method catches about 20% of non-viable seeds that would’ve otherwise wasted precious time.
Soaking Strategy: The 24-hour soak in lukewarm water is your secret weapon for breaking dormancy. Use a clean glass jar with just enough water to cover the seeds completely. Place it in a warm spot (around 70°F) to speed up root development. You’ll see those tiny white roots appear faster than if you soak them in cooler water.
Lighting Hacks: For seedlings that stretch toward light, try a simple DIY grow light setup. Place a fluorescent bulb (20-30 watts) about 12 inches above your pots for 12 hours daily. This mimics natural sunlight and prevents leggy growth. I’ve used old shop lights for this with great results—just make sure the bulbs don’t get too hot.
Overwintering Tip: During the cool, dark winter storage at 50-60°F, check your pots monthly. The soil should stay barely moist—like a wrung-out sponge. Too much moisture can cause rot, while dry soil halts growth. I wrap my pots in newspaper to prevent evaporation and keep them in a basement corner where temps stay steady.
Pro Tips for Lily Seed Pod
- Here’s how to maximize your chances of success with these patient little gardeners.
- Seed Viability Test: Before planting, float-test your seeds in a glass of water. Viable seeds sink to the bottom with...
- Soaking Strategy: The 24-hour soak in lukewarm water is your secret weapon for breaking dormancy. Use a clean glass j...
Frequently asked questions
Got questions about lily seed pods?
You’re not alone! Here are answers to the most common queries—from viability tests to growing tips—so you can plan ahead for stunning blooms next season.
How do I know if a lily seed pod is still viable?
Perform the twist test: Gently twist the pod between your fingers. If it resists and makes a slight cracking sound, the seeds are likely viable. If it crumbles easily or feels hollow, it’s time to compost it. Pro tip: Store viable pods in a paper bag in a cool, dry place until planting season!
When is the best time to plant lily seed pods?
Plant them in early spring (just as new growth emerges) or late fall (6–8 weeks before the first frost). Avoid planting in summer heat, as pods may dry out or rot before germination. For tropical lilies, spring planting works best in warmer climates.
Can I grow lilies from seed pods instead of bulbs?
Yes! Seed-grown lilies take 2–5 years to bloom (vs. 1–2 years for bulbs), but they’re genetically unique and may produce rare hybrids. For faster results, mix seed pods with bulb planting—just scatter pods lightly on top of the soil after planting bulbs.
Why aren’t my lily seed pods opening or producing seeds?
Common culprits:
- No pollination: Lilies need bees or manual cross-pollination (use a paintbrush to transfer pollen between blooms).
- Improper care: Overwatering, poor soil drainage, or nutrient deficiencies can stress plants.
- Hybrid varieties: Some cultivated lilies (like Asiatics) are sterile and won’t produce seed pods.
How should I store unplanted lily seed pods over winter?
Keep pods in a paper bag (not plastic!) in a cool (35–40°F), dry spot like a garage or basement. Avoid refrigeration—it can cause mold. Check pods monthly for moisture or pests. Label bags with the lily type and harvest date for easy tracking!
Wrapping up and next steps
Growing lily seed pods is a rewarding journey that connects you to nature’s cycle—and with the right twist-testing know-how, you’re already ahead of the game! 🌱 Whether you’re a seasoned gardener or a curious beginner, these pods hold the promise of next year’s stunning blooms. Start small: gather your pods, test their viability, and plant with confidence.
Your future garden will thank you!
Ready to take the next step? Try growing just a few pods this season, document your progress, and share your blooms with fellow plant enthusiasts. Who knows? You might just inspire others to embrace the magic of seed-pod gardening! 🌸