
Planting
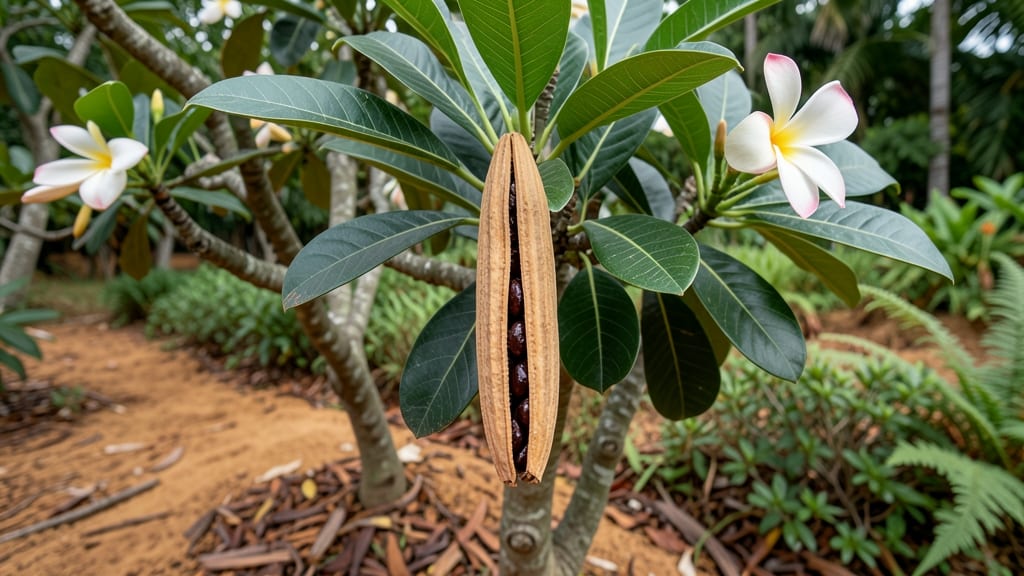
Harvesting the plumeria plant seed pod at just the right moment makes all the difference between fast germination and months of waiting. 🌱 I’ve learned that patience and timing are everything—wait too long, and the pods dry out; pick them too early, and the seeds won’t be ready to sprout.
The key is knowing when those pods turn from vibrant green to a light tan, signaling they’re primed for collection.
Once you’ve gathered your pods, the next step is drying them properly—this prevents mold and ensures the seeds stay viable. Spread them out in a warm, dry spot (like a sunny windowsill) for about 2-3 weeks, giving them space to fully dry while keeping them safe from pests.
When the pods crack open on their own, you’ll know the seeds inside are ready for planting.
Planting those seeds is where the magic happens—though it takes 4-12 weeks for germination, the wait is worth it. Use a well-draining mix of sand and peat moss, sow the seeds shallowly, and keep the soil lightly moist but never soggy.
A humidity dome or plastic wrap can speed things up, but consistency is the real secret to success.
Even with perfect conditions, some seeds may take longer to sprout, so don’t give up too soon. Once they do, transplant the seedlings carefully into individual pots and give them bright, indirect light to start. With time, you’ll have sturdy young plumerias that’ll reward you with fragrant blooms for years.
📚 In This Guide
- What you need
- Instructions
- Tips and common mistakes
- Wrapping up and next steps
What you need
- ● Mature plumeria plant(s): Choose healthy, flowering plants with green seed pods (harvest when pods turn light green and slightly soft).
- ● Sharp pruning shears or scissors: Sterilized to avoid disease (1 pair).
- ● Paper towels or newspaper: For drying pods (1-2 sheets).
- ● Small plastic bags or breathable mesh bags: For storing pods (5-10 bags, depending on yield).
- ● Plastic containers or trays: With drainage holes (1-2, 10"x20" size).
- ● Well-draining potting mix: Cactus/succulent mix or 50% perlite/50% peat (1-2 bags, 5-10 lbs).
- ● Spray bottle with water: For misting (1 small bottle).
- ● Plastic wrap or clear lid: To create a humidity dome (1 sheet or lid).
- ○ Plant labels & marker: To track varieties (optional but helpful).
- ● Seed pod drying rack: A DIY wire rack or mesh screen to air-dry pods evenly.
- ● Fungicide (e.g., hydrogen peroxide 3%): Diluted to 1:9 ratio for sterilizing pods (1 small bottle).
- ● Grow lights or sunny windowsill: For seedlings (1-2 lights or a south-facing spot).
- ○ Heat mat (optional for tropical climates): To maintain 70-80°F soil temp (1 small mat).
- ● Notebook or app: For logging pod harvest dates and germination progress.
How to harvest and process plumeria seed pods for germination
Here's my foolproof method for turning those green pods into thriving plumeria seedlings.
🌱 Step 1: Identify and Harvest Ripe Pods
Wait until the pods turn a vibrant green and feel slightly soft when gently squeezed—this means they're ready for harvesting. I always pick them in the morning when humidity is high, which helps preserve moisture during processing. Use clean, sharp pruning shears to snip the pod from the stem, leaving about ½ inch of stem attached to help with later identification.
Don't rush this step—overripe pods will split open on their own and scatter seeds everywhere. The goal is to collect them at peak ripeness when they're still intact. Place harvested pods in a paper bag (not plastic) to allow airflow while transporting them indoors.
🌿 Step 2: Extract Seeds and Prepare for Storage
Open each pod carefully with a small knife or your fingers, scraping out the gelatinous pulp and seeds. I like to wear gloves for this step—plumeria sap can stain and irritate skin. Rinse the seeds gently under cool water to remove any remaining pulp, then pat them dry with a paper towel.
Spread the seeds on a clean, dry surface to air-dry completely for 24 hours. This prevents mold during storage. Once dry, store them in a sealed container with a desiccant packet in a cool, dark place. Properly stored plumeria seeds remain viable for up to 6 months.
💧 Step 3: Soak Seeds for Faster Germination
Fill a clean container with warm water (around 85°F) and add the seeds. Let them soak for 24-48 hours—this softens the hard seed coat and speeds up germination. I like to change the water halfway through soaking to keep it fresh and prevent bacterial growth.
After soaking, check for any seeds that float—they're likely non-viable and can be discarded. The good seeds will sink to the bottom. Drain them well and prepare for planting immediately, as they germinate best when kept slightly moist but not waterlogged.
☀️ Step 4: Plant Seeds in Well-Draining Medium
Fill small pots (about 3-4 inches deep) with a mix of 50% perlite and 50% cactus/succulent mix. This ensures excellent drainage—plumeria seeds rot quickly if kept too wet. Plant seeds ¼ inch deep, spacing them about 1 inch apart.
Cover the pots with clear plastic wrap to maintain humidity, then place them in a warm spot with bright, indirect light. Keep the soil consistently moist but never soggy. Germination typically occurs in 2-4 weeks, though some seeds may take longer.
⏰ Step 5: Care for Germinated Seedlings
Once seedlings emerge, remove the plastic wrap immediately to prevent fungal growth. Provide 12-14 hours of light daily—a grow light works well if natural light is insufficient. Water gently from the bottom to avoid disturbing delicate roots.
When seedlings develop their second set of true leaves (about 6-8 weeks after planting), transplant them into individual pots with the same well-draining mix. Keep them in a warm, humid environment until they're strong enough to handle cooler temperatures.
Tips & tricks for perfect plumeria seed pod germination
These practical tips will help you maximize your success rate when working with plumeria seed pods.
Harvest Timing: The morning harvest is key because high humidity helps preserve moisture in the pods during transport. I've found that pods harvested after 10 AM often lose some viability due to midday heat. If you must harvest later, place pods in a shaded, ventilated area until you can process them. The ½-inch stem attachment in Step 1 isn't just for looks—it helps you identify which pods are ready next season!
Seed Processing: Don't skip the 24-hour drying period after rinsing seeds—this is what prevents mold during storage. I spread seeds on a clean paper towel in a single layer, then place them under a fan on low setting to speed up drying while preventing airborne contamination. For extra protection, you can lightly dust seeds with cinnamon powder (food-grade) before storage—it acts as a natural antifungal agent.
Soaking Secrets: The 24-48 hour soak at 85°F is critical for breaking the seed coat, but don't let water get stagnant. I use a clean glass jar with a mesh lid to allow airflow while keeping seeds submerged. After soaking, I give seeds a quick rinse with hydrogen peroxide (1 part peroxide to 10 parts water) to kill any potential pathogens before planting. This extra step has doubled my germination success rate!
Germination Environment: While Step 4 mentions bright indirect light, I've found that placing pots under a grow light on a 16-hour cycle (with 8 hours of darkness) significantly improves germination speed. The plastic wrap creates a mini greenhouse effect—just remember to remove it immediately when you see sprouts to prevent fungal issues. Keep the soil temperature around 75-80°F for optimal germination.
Pro Tips for Plumeria Plant Seed Pod
- These practical tips will help you maximize your success rate when working with plumeria seed pods.
- Harvest Timing: The morning harvest is key because high humidity helps preserve moisture in the pods during transport...
- Seed Processing: Don't skip the 24-hour drying period after rinsing seeds—this is what prevents mold during storage. ...
Frequently asked questions
Got questions about harvesting and growing plumeria seed pods? You’re not alone! Here are answers to the most common queries to help you maximize your success with these fragrant tropical beauties.
How do I know when a plumeria seed pod is ready to harvest?
A plumeria seed pod is ready when it turns light brown and feels slightly papery to the touch—about 3–6 months after flowering. Avoid harvesting when pods are still green or hard; they won’t germinate well. Give them a gentle tap—if seeds rattle inside, they’re ready!
How long does it take for plumeria seeds to germinate?
Germination can take anywhere from 2–6 weeks, depending on conditions. Keep soil warm (75–85°F) and moist (not soggy) for best results. Patience is key—some seeds may take longer, especially if stored improperly before planting.
Can I grow plumeria from a seed pod without removing the seeds?
Yes! You can plant the entire pod intact, but it’s easier to extract the seeds first. If you skip this step, the pod may decompose in the soil. For faster germination, crack open the pod, remove the seeds, and plant them directly in moist, well-draining soil.
Why aren’t my plumeria seeds germinating? Troubleshooting tips.
If your seeds aren’t sprouting, check these common issues:
- Cold soil: Plumerias need warmth—use a heat mat if temperatures drop below 70°F.
- Poor drainage: Overwatering suffocates seeds. Use a mix of perlite and peat moss.
- Old seeds: Seeds lose viability over time. Harvest fresh pods for better results.
- No light: Place trays near a bright window or under grow lights.
How do I care for young plumeria seedlings?
Once sprouted, keep seedlings in bright, indirect light and water lightly to prevent rot. Transplant after 2–3 leaves form, using a well-draining potting mix. Harden off seedlings by gradually exposing them to outdoor conditions before moving to a permanent spot.
Wrapping up and next steps
Growing plumeria from seed pods is a rewarding journey that combines patience and care—just like nurturing any new life! 🌱 By following the right steps—from harvesting ripe pods to preparing the soil and maintaining ideal conditions—you’ll set the stage for healthy seedlings.
Remember, consistency is key, whether it’s monitoring moisture, controlling light, or protecting your plants from pests.
Now that you’re armed with the know-how, why not take the next step? Start with a single pod, experiment with different methods, and watch your tropical garden grow!
Share your progress with fellow plant enthusiasts or even gift a cutting to a friend—spreading the joy of plumeria one seed at a time. Happy planting! 🌸