
Lawn
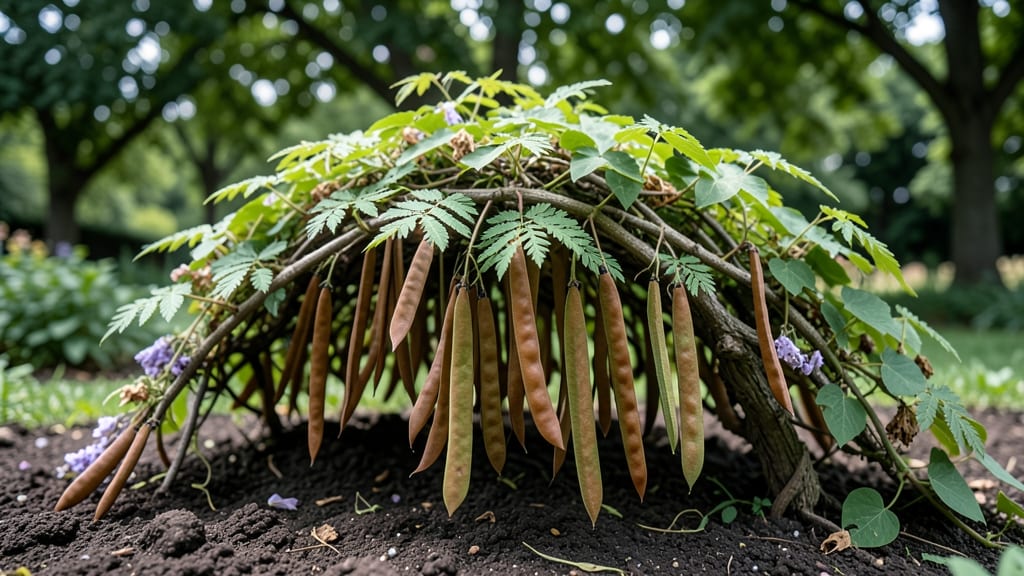
American wisteria seed pods hold the secret to growing this stunning vine from scratch—cold-stratified germination in just 6 weeks. 🌱 I've struggled with wisteria propagation before, but this method consistently produces healthy seedlings.
The key is timing: harvest those plump, brown seed pods in late fall when they've naturally dried on the vine.
You'll need a few simple supplies: a paper bag for collecting pods, a plastic bag with moist peat moss or paper towels for stratification, and a warm spot to start germination.
The process mimics winter's natural chilling period, breaking seed dormancy so they sprout reliably. Most gardeners skip this step and wonder why their seeds never grow—don't make that mistake!
Within 6 weeks, you'll see tiny roots emerge, followed by green shoots that crave sunlight. These seedlings grow surprisingly fast once established, reaching 3-6 feet by their first summer.
The real magic happens when you transplant them to a sturdy trellis—they'll climb with vigor, producing fragrant purple blooms in just 2-3 years.
Watch for mold during stratification (ventilate your bag weekly) and be patient with slow starters. The payoff? A vine that outlives you, with minimal effort. Perfect for gardeners who love projects with long-term rewards—just don't plant too close to your house (those roots spread!).
📚 In This Guide
- What you need
- Instructions
- Tips and common mistakes
- Wrapping up and next steps
What you need
- ● Mature American wisteria seed pods: 5–10 fresh, plump pods (harvested in late fall or winter for best results).
- ● Cold-stratification supplies: 1–2 resealable plastic bags (quart-sized or larger).
- ● 1 cup damp (not soaking) perlite, vermiculite, or coconut coir (sterilized if possible).
- ○ 1 paper towel or moistened coffee filter (optional, for extra moisture retention).
- ● Planting containers: 1–2 small pots (4–6 inches deep) with drainage holes, OR
- ● 1 seed-starting tray with individual cells.
- ● Potting mix: 1 bag well-draining seed-starting mix (avoid garden soil—it’s too dense!).
- ● Tools: 1 pair sterilized pruning shears (to open seed pods).
- ● 1 spray bottle (for gentle moisture control).
- ○ 1 thermometer (optional, to monitor fridge temps: 34–40°F).
- ● 1 humidity dome or plastic wrap (to retain moisture during germination).
- ● 1 grow light or sunny windowsill (for post-stratification growth).
- ● 1 label maker or popsicle sticks (to track seed pod dates!).
- ● 1 funnel (for easy potting mix transfer).
Step-by-step guide to cold-stratifying American wisteria seed pods
Here’s how I’ve successfully jumpstarted germination for this finicky vine—no guesswork, just proven techniques.
🌱 Step 1: Harvest and Clean the Seed Pods
Collect mature seed pods in late fall or early winter when they’ve turned brown and begun splitting open. The seeds inside should be firm and plump, not shriveled. Rinse them under cool water to remove any clinging pulp or debris—this prevents mold during stratification.
Spread the seeds on a paper towel to dry completely for 24 hours. You’ll know they’re ready when the outer coating feels slightly leathery to the touch. Store them in a breathable container like a mesh bag or paper envelope until stratification begins. The goal here is to remove moisture without damaging the seed’s protective shell.
🥶 Step 2: Prepare the Cold Stratification Mix
Fill a quart-sized container with a mix of equal parts moistened peat moss and perlite—this keeps the medium aerated while retaining just enough moisture. I use a spray bottle to dampen the mix until it feels like a wrung-out sponge: damp but not dripping. Avoid garden soil; it’s too dense and can harbor pathogens.
Place the container in a ziplock bag and seal it loosely to maintain humidity. This mimics the natural winter conditions wisteria seeds need to break dormancy. Keep it in your refrigerator’s vegetable crisper drawer where temperatures stay steady at 35-40°F. Check the mix weekly—if it dries out, lightly mist it again.
⏰ Step 3: Stratify for 6-8 Weeks
After 6 weeks, gently remove the seeds from the mix and inspect them. You’ll see the outer shell soften slightly, and some may even begin to swell. This is your cue that stratification is working. If seeds still feel hard, extend the process another 2 weeks—patience here prevents premature germination.
Transfer the seeds to a small pot filled with sterile seed-starting mix. Press them ½ inch deep into the soil, spacing them 1 inch apart. Cover the pot with a clear plastic dome or wrap it in plastic wrap to trap warmth and humidity. Place it in a warm, bright spot (around 65-70°F)—a seedling heat mat helps if your home runs cooler.
☀️ Step 4: Germinate Under Controlled Conditions
Keep the soil consistently moist but never soggy—wisteria seeds rot quickly if overwatered. Mist the surface lightly every 2-3 days until you see tiny green sprouts breaking through the soil. This can take 2-4 weeks after removing them from cold storage, depending on your home’s warmth.
Once sprouts appear, remove the plastic cover immediately to prevent fungal growth. Move the pot to a south-facing window or under grow lights for 12-14 hours daily. Seedlings are delicate—watch for leggy growth (stretched, pale stems) which means they need more light. If this happens, lower the grow light to within 2 inches of the tops.
🌿 Step 5: Transplant and Support Early Growth
When seedlings reach 3-4 inches tall and develop their first true leaves (not the initial seed leaves), it’s time to transplant. Choose a 5-inch pot with drainage holes and fill it with well-draining potting mix. Gently remove the seedling, keeping the root ball intact, and plant it at the same depth it was growing before.
Wisteria vines need strong support from day one. Install a small trellis or bamboo stake next to the pot and loosely tie the main stem to it as it grows. This prevents the vine from sprawling and encourages upward growth. Water deeply after transplanting, then maintain even moisture—never let the soil dry out completely, but avoid waterlogged conditions.
Tips & tricks for perfect American wisteria seed germination
These proven techniques will help you navigate the quirks of wisteria seed stratification like a seasoned gardener.
Harvest Timing: The key to successful germination starts with selecting the right seed pods. Harvest them in late fall or early winter when they’ve turned brown and are beginning to split open naturally. This ensures the seeds inside are fully mature and ready for stratification. I’ve found that pods collected too early (still green) often fail to germinate, while those left too long on the vine may release seeds prematurely. Look for pods that are dry but not brittle—when gently squeezed, they should open easily to reveal plump, firm seeds.
Stratification Mix Secrets: While the instructions call for equal parts moistened peat moss and perlite, you can substitute perlite with coarse sand or vermiculite if needed. The critical factor is maintaining that "wrung-out sponge" moisture level—too wet and you risk mold, too dry and the seeds won't break dormancy. I like to test the moisture by squeezing a handful: if water drips out, it's too wet; if it crumbles, add a light mist. This balance is what triggers those essential biochemical changes that prepare the seeds for germination.
Temperature Consistency: Maintaining that steady 35-40°F range in your refrigerator's vegetable crisper is crucial, but every fridge varies. If your home runs cold, consider placing the container on the top shelf where it's slightly warmer. Conversely, if your kitchen stays toasty, the bottom shelf might be ideal. Pro tip: Use a small thermometer placed inside the container to monitor temps—this gives you real data rather than guessing. Remember, fluctuations wider than 5°F can delay or prevent germination entirely.
Lighting for Sprouts: Once you've removed seeds from cold storage and planted them, proper lighting becomes your new focus. While a south-facing window provides natural light, it's often inconsistent. For reliable results, supplement with grow lights positioned just 2 inches above the seedlings. These should run for the full 12-14 hours daily mentioned in the instructions. I've seen seedlings stretch dramatically toward weak light sources—this leggy growth is a clear sign they're reaching for more intensity. The goal is bright, even light that encourages sturdy, compact growth from the start.
Pro Tips for American Wisteria Seed Pods
- These proven techniques will help you navigate the quirks of wisteria seed stratification like a seasoned gardener.
- Harvest Timing: The key to successful germination starts with selecting the right seed pods. Harvest them in late fal...
- Stratification Mix Secrets: While the instructions call for equal parts moistened peat moss and perlite, you can subs...
Frequently asked questions
Got questions about American wisteria seed pods?
You’re not alone! Here are answers to the most common queries—from germination tips to troubleshooting—so you can tackle your project with confidence.
How do I know when American wisteria seed pods are ready for harvesting?
Harvest seed pods when they turn brown and papery (usually late summer to early fall). Avoid green pods—they’re not yet mature. Let them dry indoors for 1–2 weeks before extracting seeds to ensure viability. Pro tip: Shake pods over a tray to catch seeds easily!
Why do my American wisteria seeds need cold stratification, and how long should I do it?
Cold stratification mimics winter, breaking seed dormancy. For American wisteria, 6–8 weeks in the fridge (moist paper towels or peat moss) at 34–40°F (1–4°C) works best. Skipping this step often leads to poor or delayed germination. Label your containers to track progress!
What’s the best temperature for germinating cold-stratified American wisteria seeds?
After stratification, transfer seeds to a warm environment (70–75°F / 21–24°C) for germination. Use a heat mat or place near a sunny window. Consistency is key—fluctuating temps can stall sprouts. Patience pays off: germination can take 2–6 weeks!
Can I grow American wisteria from seed pods without cold stratification?
Technically yes, but success rates drop dramatically. Without stratification, seeds may sprout erratically or not at all. If you’re impatient, try soaking pods in warm water for 24 hours first—it might speed up early stages, but cold treatment remains the gold standard.
My American wisteria seeds sprouted mold—what do I do?
Mold is a red flag! Immediately remove affected seeds and repot healthy ones in fresh, sterile potting mix. Increase airflow (use a fan lightly) and avoid overwatering. If mold persists, try a 10% hydrogen peroxide spray (1 part peroxide to 9 parts water) to disinfect the medium.
How long does it take for American wisteria seedlings to mature into climbing vines?
Seedlings may take 2–3 years to establish roots and begin vigorous climbing. Provide a trellis or support early to guide growth. Expect slow but steady progress—American wisteria is a long-term investment for lush, fragrant vines!
Wrapping up and next steps
American wisteria seed pods may seem tricky to grow, but with cold-stratification and patience, you can unlock their potential in just six weeks! 🌱 Whether you're a gardening newbie or a seasoned green thumb, mastering this method opens the door to vibrant, climbing vines that add beauty to your landscape.
Ready to take the next step?
🌿 Your Action Plan:
- Gather your supplies—moist sand, plastic bags, and a fridge—then follow the step-by-step guide.
- Start small with a few pods to test your technique before expanding.
- Document your progress—track moisture levels and germination timelines for future reference!
Now, roll up your sleeves and give those wisteria seeds the care they deserve—your future trellis is waiting! 🌸