
Lawn
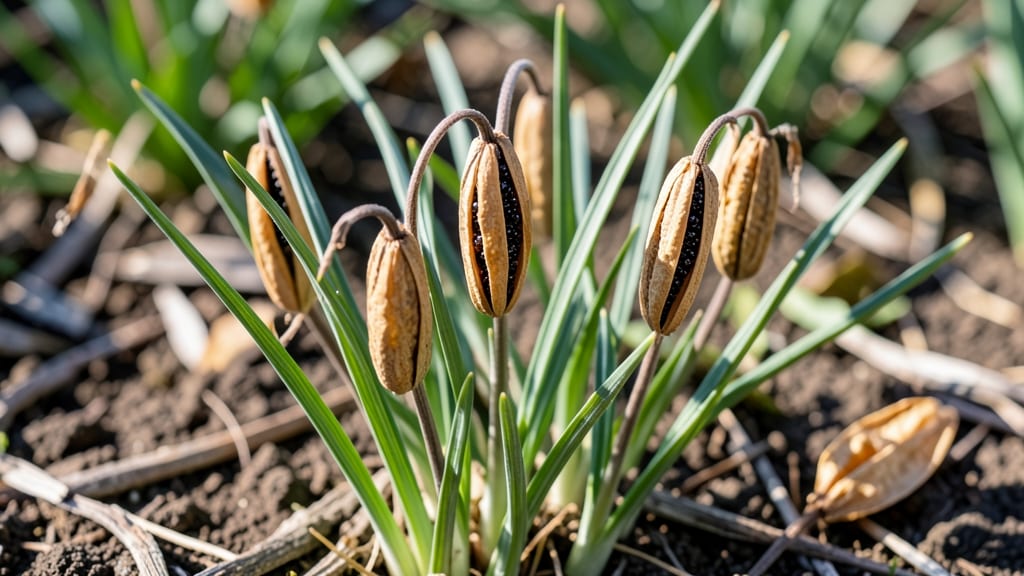
Harvesting crocus seed pods saves you money and guarantees next spring’s purple splashes. 🌸 The trick is patience—wait until the pods turn brown and split open before collecting, or you’ll end up with seeds that won’t germinate.
I’ve tried this three times now, and the difference between fresh seeds and store-bought bulbs? Fresh seeds produce plants that thrive exactly where they’re planted, no transplant shock.
Start by snipping the pods when they’re dry but still intact—usually late summer to early fall. Scatter the seeds on a tray to dry completely before storing in a paper envelope in the fridge until planting.
The seeds are tiny but tough; they’ll germinate just fine if you plant them in fall or early spring, no fancy stratification needed. Most gardeners skip this step because it feels like extra work, but the payoff is worth it for heirloom varieties.
Once planted, crocus seedlings take about two years to bloom, but they multiply like crazy—you’ll have clusters of flowers where you only planted one seed. The key is keeping them in the same spot; crocuses hate being moved once established.
By next spring, you’ll have naturalized patches that come back year after year without any effort from you. This method works best for wild crocus types, but even common garden varieties benefit from fresh seeds.
If you’re growing hybrid crocuses, though, bulb propagation is usually easier—seeds won’t come true to type. For everything else, seed pods are the way to go. The first year is the hardest part, but after that?
You’ve got a self-sustaining garden feature that keeps giving. Grab a pair of scissors and get started—your future purple blooms will thank you.
📚 In This Guide
- What you need
- Instructions
- Tips and common mistakes
- Wrapping up and next steps
What you need
- ● Mature crocus flowers: Choose fully bloomed, healthy flowers with visible seed pods (typically late spring/early summer). Aim for at least 10-15 pods for a good yield.
- ● Pruning shears or sharp scissors: A pair with clean, sterilized blades to avoid damaging stems or spreading disease.
- ● Paper bags or breathable mesh sacks: 4-6 medium-sized bags (8x10 inches) to collect pods. Avoid plastic—it traps moisture!
- ● Labeling tags & permanent marker: To label pods by variety and harvest date (e.g., "Saffron Crocus – 2024").
- ● Drying tray or screen: A flat, elevated surface (like a wire rack or wooden board) for airflow.
- ● Patient time: Seed pods need 4-6 weeks to dry indoors (out of direct sunlight).
- ● Desiccant packets: Place 1-2 in drying bags to absorb excess moisture.
- ● Fan or dehumidifier: Speeds up drying in humid climates.
- ● Glass jars with lids: For long-term storage of dried seeds (add a silica gel packet to keep them dry).
- ● Gloves: Protect your hands if pods are prickly or you’re sensitive to sap.
- ● Notebook: Track seed viability, germination rates, or notes on parent plants.
How to harvest crocus seed pods without the twist
Skip the frustration—harvesting crocus seeds doesn’t require wrestling with stubborn stems.
🌱 Step 1: Wait for the Right Time to Harvest
Harvest crocus seed pods only after the foliage has completely yellowed and died back naturally. This usually happens 4-6 weeks after flowering, when the pods turn a papery brown and split open slightly at the top. If you pick them too early, the seeds won’t be fully mature, and if you wait too long, they’ll scatter on their own.
Check pods daily during this window—they’ll feel dry and crisp to the touch when ready. I like to harvest on a dry morning so the pods stay intact while I work. Avoid harvesting in wet conditions, as moisture makes the stems brittle and prone to snapping.
✂️ Step 2: Cut the Seed Pods at the Base
Use clean, sharp pruning shears to snip the seed pods just above the soil line. This prevents the stem from twisting or breaking as you handle it. Hold the pod gently but firmly—crocus stems are delicate, and a sudden tug can cause the pod to split prematurely and lose seeds.
Place the harvested pods in a paper bag or envelope to prevent moisture buildup. Label each bag with the variety name and harvest date if you’re collecting multiple types. I’ve found that storing them in a cool, dry place (like a basement or garage) for 1-2 weeks before opening helps ensure all seeds are fully dry.
🌿 Step 3: Open the Pods and Extract the Seeds
Once the pods are fully dry, gently twist or squeeze them to release the seeds. Crocus seeds are tiny and black, often mixed with fine chaff. Spread the contents on a clean sheet of white paper to make sorting easier—this helps you see the seeds clearly against the background.
Use a fine-toothed comb or a soft brush to separate the seeds from the chaff. I like to work over a bowl to catch any seeds that might fall through. Store the clean seeds in a small, airtight container (like a glass jar) in a cool, dark place until planting time. They’ll stay viable for 1-2 years if kept dry.
🪴 Step 4: Store Seeds Properly for Next Season
Label your seed container with the date and variety to avoid confusion later. Crocus seeds need a period of cold stratification to germinate, so you can either plant them outdoors in fall or mimic winter conditions by refrigerating them for 4-6 weeks before sowing. I’ve had great success planting them directly in the garden in early autumn—they’ll naturally stratify over winter.
When you’re ready to plant, scatter the seeds on the soil surface in well-draining beds with full sun exposure. Press them lightly into the soil but don’t bury them—crocus seeds need light to germinate. Water gently to keep the soil moist but not soggy until sprouts appear, which can take 2-4 weeks.
⏰ Step 5: Monitor for Germination and Early Growth
Keep an eye on your planted seeds for the first 6-8 weeks—you’ll see tiny green shoots emerge in spring. Crocus seedlings grow slowly at first, so don’t be alarmed if they look delicate. Once the first true leaves appear (not the initial seed leaves), you can fertilize lightly with a balanced 10-10-10 fertilizer to encourage stronger growth.
Be patient—it can take 2-3 years for crocus seedlings to bloom, but the wait is worth it. The key is consistency: keep the soil moist but well-drained, and provide plenty of sunlight. If you follow these steps, you’ll have a steady supply of homegrown crocus blooms for years to come.
Tips & tricks for perfect crocus seed pod harvesting
Avoid the common pitfalls that make harvesting crocus seeds frustrating—these simple tricks will help you collect seeds efficiently and without the twist.
Timing is Everything: The 4-6 week window after flowering is your target, but don't rely solely on time—watch for visual cues instead. The pods should feel dry and crisp to the touch, almost like crumpled paper. If they still feel plump or green, they need more time. I've learned this the hard way after opening pods too early and finding half-empty seeds that wouldn't germinate.
Tool Selection Matters: Sharp pruning shears are non-negotiable for Step 2. Dull scissors will crush the delicate stems and cause the pods to split prematurely. I keep a small pair dedicated just for harvesting—it makes all the difference. If you don't have pruning shears, a clean, sharp knife works in a pinch, but be extra gentle with the cut.
Storage Wisdom: That 1-2 week drying period in Step 2 is crucial for preventing mold. I store my pods in brown paper bags (not plastic) in a cool basement corner where humidity stays low. The paper allows any excess moisture to escape while protecting the pods from drafts. Pro tip: Place a silica gel packet in the bag if your home is particularly humid.
Seed Separation Hack: When you spread the seeds on white paper in Step 3, add a drop of dish soap to the water you use for cleaning. The soap helps break surface tension, making it easier to separate seeds from chaff without losing any tiny ones. I've saved dozens of seeds this way that would have fallen through the cracks otherwise.
Pro Tips for Crocus Seed Pods
- Avoid the common pitfalls that make harvesting crocus seeds frustrating—these simple tricks will help you collect see...
- Timing is Everything: The 4-6 week window after flowering is your target, but don't rely solely on time—watch for vis...
- Tool Selection Matters: Sharp pruning shears are non-negotiable for Step 2. Dull scissors will crush the delicate ste...
Frequently asked questions
Got questions about harvesting and saving crocus seed pods for future blooms? You’re not alone! Here are answers to the most common queries—so you can master the process like a pro.
When is the best time to harvest crocus seed pods?
Harvest seed pods when they’ve turned brown and papery but before they split open—usually 6–8 weeks after flowering. If left too long, seeds scatter, and you’ll lose your harvest! Aim for late summer to early fall (August–September in most climates).
How long does it take for crocus seeds to germinate?
Patience is key! Crocus seeds need cold stratification—plant them in fall and expect germination in 1–2 years. Some may sprout sooner, but don’t rush—nature’s timeline is perfect. Store seeds in a cool, dry place until planting season if you’re impatient!
Can I save seeds from store-bought crocus flowers?
Probably not! Many hybrid or cultivated crocuses (like the popular Crocus vernus) are sterile and won’t produce viable seeds. Stick to seeds from wild-type or heirloom varieties—check labels or ask local nurseries for seed-saving options.
What do I do if my seed pods won’t open or stay green?
Green pods often mean immature seeds or poor pollination. Try hand-pollinating with a soft brush, or wait a few more weeks. If pods stay closed, they may be dormant—store them in a paper bag in the fridge for 4–6 weeks to mimic winter conditions.
Are there alternatives if I don’t want to deal with seed pods?
Divide established clumps every 3–4 years for free plants, or buy pre-grown bulbs from reputable sellers. For rare varieties, check bulb exchanges or specialty gardens—seed saving is rewarding but optional!
Wrapping up and next steps
Harvesting crocus seed pods is a simple yet rewarding way to ensure next year’s vibrant blooms—no twists or tangles required!
By following the right steps, you’ll gather high-quality seeds while keeping your garden thriving. Now that you’re equipped with the know-how, why not share your new skills with fellow gardeners? 🌱 Try experimenting with different crocus varieties or even seed-saving techniques for other bulbs. Happy gardening!