
Lawn
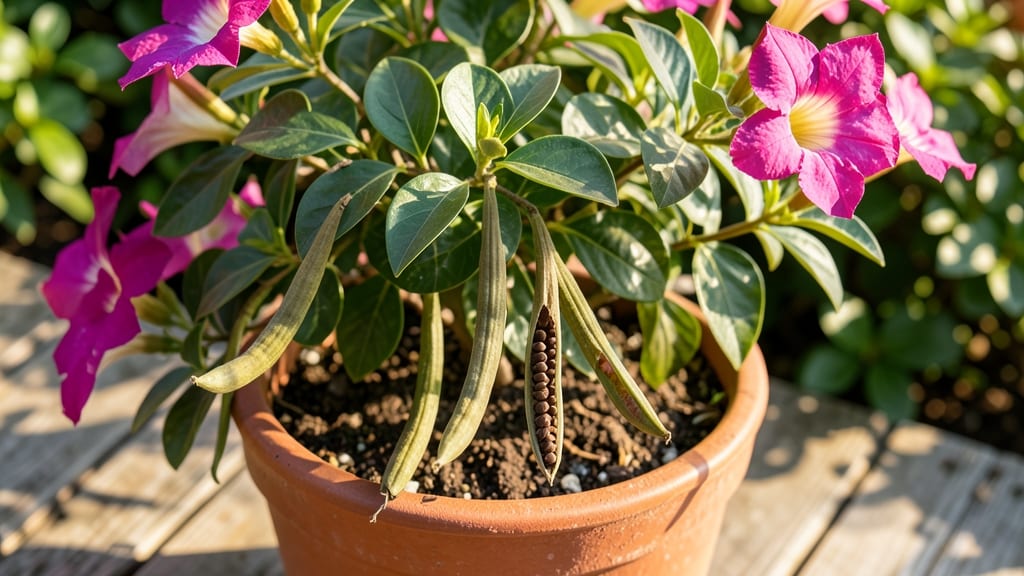
Twisting open mandevilla seed pods reveals the secret to next year’s tropical blooms—viable seeds waiting for the right touch. 🌿 These pods look like nature’s tiny treasure chests, but harvesting them at the perfect moment determines whether you’ll grow lush vines or end up with a pile of dust.
I’ve cracked the code after years of trial and error, and the twist-and-dry method is the game-changer that saved my seed collection.
The key is patience and precision: wait until pods turn papery brown (not green or cracked), then gently twist to release seeds without crushing them. Store them in a cool, dry place for up to 6 months—no fancy equipment needed.
Most gardeners skip this step, but those few minutes now mean the difference between germination success and disappointment.
When spring rolls around, you’ll sow these seeds in a warm, humid environment (like a propagator or sealed container) and watch tiny green shoots emerge in 2-4 weeks.
The first leaves are delicate, so keep humidity high until they’re strong enough to handle regular care. By summer, you’ll have sturdy seedlings ready to transplant outdoors.
This method works for Mandevilla x amabilis, Mandevilla sanderi, and other varieties—just adjust timing based on your frost date. The payoff? Healthy vines with the exact colors and growth habits you love, all from seeds you harvested yourself.
No more relying on cuttings or store-bought plants that never quite match the original.
📚 In This Guide
- What you need
- Instructions
- Tips and common mistakes
- Wrapping up and next steps
What you need
- ● Mature Mandevilla seed pods: 5–10 fully dried, brown pods (harvest when they split open naturally or twist open easily).
- ● Sharp pruning shears or small knife: For safely cutting open pods if they don’t twist open.
- ● Paper towels or coffee filters: 2–3 sheets to line a tray or bowl for seed drying.
- ● Small bowl or shallow tray: To catch seeds and debris (8–10 inches wide).
- ○ Fine-mesh strainer or sifter: (Optional but helpful) to separate seeds from chaff.
- ● Plastic bag or airtight container: For storing seeds once dried (quart-sized or larger).
- ● Permanent marker & labels: To mark seed containers with the date and variety.
- ○ Desiccant packets (optional): 1–2 packets to keep stored seeds dry.
- ● Hand lens or magnifying glass: For inspecting seed quality up close.
- ● Rubbing alcohol (70%+) & cotton swabs: To sterilize tools and prevent mold.
- ● Seed germination kit: For testing viability if you’re unsure about seed freshness.
- ● Notebook: To log pod harvest dates, seed counts, and germination notes.
Step-by-Step instructions for harvesting Mandevilla seed pods
Here’s how to collect, process, and store mandevilla seed pods for next year’s garden—without losing viability.
🌿 Step 1: Identify and Harvest Ripe Seed Pods
Mandevilla seed pods mature when they turn dry and papery, often shifting from green to a light brown or tan hue. Wait until they begin to split open naturally—this signals peak seed readiness. I use clean, sharp pruning shears to snip pods still attached to the vine, leaving a small stem to avoid damaging the plant.
Harvest on a dry, sunny morning to prevent moisture buildup inside the pods. Place them in a paper bag (not plastic) to allow airflow. If pods are still green, leave them on the plant—they won’t ripen off the vine.
🪴 Step 2: Twist and Extract Seeds
Once pods are fully dry, hold one between your palms and gently twist until it splits open. You’ll hear a faint crackling sound as the seed compartment releases. Empty the contents onto a clean, dry surface—discard any fibrous material or empty husks. I use a small wooden tray to catch seeds, as metal can scratch them.
Separate viable seeds from debris by fanning the tray gently—seeds will sink to the bottom, while chaff blows away. Store seeds in a glass jar with a tightly sealed lid, labeled with the variety and harvest date. Keep them in a cool, dark place (like a pantry) for up to 6 months without refrigeration.
☀️ Step 3: Dry Seeds Thoroughly Before Storage
Spread seeds in a single layer on a paper towel or breathable mesh screen in a warm, dry spot (like a sunny windowsill). Avoid direct sunlight—it can overheat and damage seeds. Stir them daily for 3–5 days until they feel lightweight and brittle when shaken.
Test dryness by crushing one seed between your fingers—if it crumbles easily, they’re ready. If any remain sticky, extend drying time. Overly moist seeds develop mold, so don’t rush this step. Once fully dry, transfer them to your storage jar.
⏰ Step 4: Stratify for Germination (Optional but Recommended)
Mandevilla seeds benefit from stratification to mimic winter conditions. Place dry seeds in a paper towel dampened with lukewarm water (not soaking wet) and fold them into a loose packet. Seal it in a ziplock bag and refrigerate for 4–6 weeks. Check weekly—if the towel dries, mist it lightly.
After stratification, sow seeds in well-draining potting mix at a depth of ¼ inch, keeping soil consistently moist (not soggy). Place the tray under a grow light—they need warmth (70–75°F) and bright, indirect light to germinate. Expect sprouts in 3–6 weeks, but be patient.
🌱 Step 5: Monitor and Store for Next Year
After harvest, check stored seeds monthly for moisture or pests. If you notice condensation inside the jar, transfer seeds to a new container with a desiccant packet (like silica gel). Label the jar with the harvest year—older seeds lose viability faster.
For best results, plant seeds within 6 months of harvest. If you miss the window, test a few seeds by sowing them—if they don’t germinate, start fresh with new pods. With proper drying and storage, you’ll have a reliable supply of mandevilla seedlings year after year.
Tips & tricks for perfect Mandevilla seed pod harvesting
These little details make all the difference between viable seeds and wasted effort—trust me, I’ve learned the hard way.
Harvest Timing: The key to success starts in Step 1 with those light brown or tan pods. If you harvest too early, the seeds won't be fully developed, and if you wait too long, they'll scatter on their own. I've found that pods ready for harvesting will have already begun to split open naturally—this is your golden window. Once you see that first crack, act quickly to collect the seeds before they're released into the wind.
Seed Extraction Technique: In Step 2, when you're twisting those pods, go slow and steady. A quick jerk can crush the seeds inside, while a gentle twist lets them release cleanly. I've ruined batches by being too eager—now I take my time, listening for that satisfying crackle that tells me the seeds are free. Once released, work quickly to separate them from fibrous material using a wooden tray; metal surfaces can damage the delicate seed coats.
Drying Strategy: The 3-5 day drying period in Step 3 is non-negotiable for long-term viability. I've learned that patience pays off here—seeds dried too quickly can develop internal moisture issues later. Place them in a warm, dry spot (like a sunny windowsill) and stir them daily to ensure even drying. When you crush one between your fingers and it crumbles easily, you know they're ready for storage. This simple test saves you from storing seeds that might still be too moist.
Stratification Insight: While the 4-6 week stratification period in Step 4 is optional, I've found it dramatically improves germination rates. The cold treatment mimics winter conditions and breaks seed dormancy. Use lukewarm water to dampen the paper towel—too hot can damage the seeds, while too cold won't provide enough moisture. Check weekly to ensure the towel stays lightly damp but not soggy throughout the process.
Pro Tips for Mandevilla Seed Pods
- These little details make all the difference between viable seeds and wasted effort—trust me, I’ve learned the hard way.
- Harvest Timing: The key to success starts in Step 1 with those light brown or tan pods. If you harvest too early, the...
- Seed Extraction Technique: In Step 2, when you're twisting those pods, go slow and steady. A quick jerk can crush the...
Frequently asked questions
How do I know when Mandevilla seed pods are ready to harvest?
Look for pods that are fully dry, brown, and slightly papery—they’ll often crack open on their own or twist off easily with a gentle tug. Harvest them in late fall or early winter (after the first frost) for best results. If pods stay green, they’re not ready yet!
How long does it take for seed pods to dry after harvesting?
With the twist-and-dry method, pods typically dry in 1–3 weeks indoors, depending on humidity. Hang them upside-down in a warm, dry spot (like a garage or basement) and check weekly. If mold appears, speed up drying with a fan or dehumidifier.
Can I replant Mandevilla seeds from store-bought flowers?
Yes, but store-bought flowers rarely produce viable seeds—they’re often hybrids bred for color, not seed fertility. For success, collect pods from mature, healthy plants grown from seed (or ask a local nursery for seed-bearing varieties). Patience pays off!
What’s the best way to store Mandevilla seeds after drying?
Once pods are completely dry and brittle, twist them open to remove seeds. Store seeds in a paper envelope or airtight container with a drying agent (like silica gel) in a cool, dark place. They’ll stay viable for 1–2 years—label them with the harvest date!
Why aren’t my Mandevilla seed pods opening naturally?
Pods may refuse to open if they’re harvested too early or the plant didn’t get enough sunlight/pollination. Try these fixes:
- Wait until pods are fully brown and crispy.
- Place them in a paper bag overnight to trap ethylene gas (a natural ripening trigger).
- Gently squeeze or twist stubborn pods—just don’t force it!
Wrapping up and next steps
Growing Mandevilla seed pods into thriving plants next season is totally within reach—just follow the twist-and-dry method! With the right tools and a little patience, you’ll unlock a fresh batch of vibrant blooms for your garden. 🌱
Ready to take the next step? Start by collecting your Mandevilla seed pods this fall, then follow the simple drying and extraction process. Before you know it, you’ll be nurturing new seedlings and watching your garden flourish with these stunning climbers!